banner

Announcement

Collapse
No announcement yet.

Broken crybaby 535Q PLEASE HELP!!

Collapse
X
 
  • Filter
  • Time
  • Show
Clear All
new posts

  • GoldenVulture
    replied
    Re: Broken crybaby 535Q PLEASE HELP!!


    What Ufd and voltage is those electrolytics you've hacked in there ?Where's the Tantalum cap gone ?
    Are you sure your additions aren't shorting to surrounding traces/tracks ?

    I found a pic of what your PCB should look like.


    Do you have a schematic for it ? I found this.
    Last edited by GoldenVulture; 11-12-2015, 06:55 PM.

    Leave a comment:


  • EuphoriX
    replied
    Re: Broken crybaby 535Q PLEASE HELP!!

    EDIT: Ok, so I did another test on the pot wires, and whaddoyah know, The blue wire from the pot stops continuity at the 13 pin plug. Makes sense this would screw everything up, since blue is the signal bandpass filter wire... kinda crucial, apparently. I looked at the plug, and it has some kinda clam holding the wires. The blue one seems continuous when I put a lead on the wire and a lead on the clip holding it... but... It's not carrying from the switch to the pcb... any ideas on how to fix this?

    Leave a comment:


  • EuphoriX
    replied
    Re: Broken crybaby 535Q PLEASE HELP!!

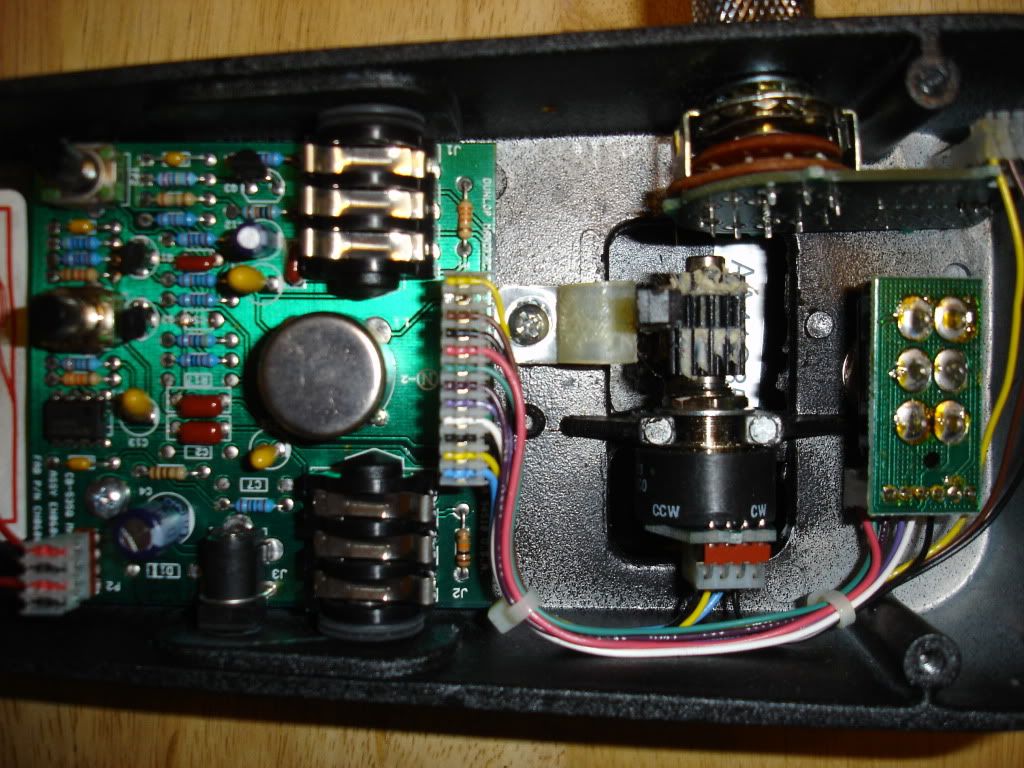
    Here's a pic of the whole thing... I know it ain't pretty, but it should be working... http://postimg.org/image/dk1wm1ht1/
    And here's a pic of the multineter across the input and output. Settles at 0.01-0.03 which is normal (don't know why the pic is upside down) http://postimg.org/image/lbimkllyd/

    Leave a comment:


  • EuphoriX
    replied
    Re: Broken crybaby 535Q PLEASE HELP!!

    Alright, so, got the new caps in... now there's a clear signal flow all the way from the input to output jack. Problem is, the wah isn't making ANY sound when I kick it on... not even like a volume anymore. Not sure what to make of this... pot's hooked up right, and I can put one end of the multimeter on the input, and one on the output, and get signal. No dead zones in the pcb... caps are all working... what could be the problem?

    Leave a comment:


  • blueman335
    replied
    Re: Broken crybaby 535Q PLEASE HELP!!

    Originally posted by Kamanda~SD View Post
    Like I said, lesson learned...do a little bit of reading on the basics of soldering and basic components before you tackle another one!

    Bull in a China shop comes to mind...

    I imagine the next one will go smoother.

    Leave a comment:


  • Kamanda~SD
    replied
    Re: Broken crybaby 535Q PLEASE HELP!!

    Yeah let us know!

    Like I said, lesson learned...do a little bit of reading on the basics of soldering and basic components before you tackle another one!

    Leave a comment:


  • Hank-
    replied
    Re: Broken crybaby 535Q PLEASE HELP!!

    I saw the new pics but looks like you've sort out the problem. Those tantalum caps are polarised like electrolytic caps, make sure the polarity is correct on the one that's in there or the new replacement.
    Yeah underside as in not the side where you see all the components but the bottom side where you can see the legs of all components soldered. Dont drill new holes, the holes are already there, get a solder suck pump to clean up excess soder & open up the holes if needed, they are cheap & work well.

    Hope all goes well, the 535Q rocks!!
    Last edited by Hank-; 11-12-2015, 02:14 AM.

    Leave a comment:


  • EuphoriX
    replied
    Re: Broken crybaby 535Q PLEASE HELP!!

    Never mind.. got it all figured out. That's a tantalum 35v capacitor, which I can get at radio shack down the road. Then I'll just swap em out, and the signal will be back online. There's hope for my little pedal yet! Thank you guys for your suggestions. I'll let you know how it goes.

    Leave a comment:


  • EuphoriX
    replied
    Re: Broken crybaby 535Q PLEASE HELP!!

    I'VE GOT IT!! So, like you guys suggested, I ran a continuity test with the multimeter. Surprisingly, signal was in fact carrying through that mess of soldering, through the inductor, and up to the yellow capacitor, THEN IT STOPPED. It stopped between the legs of the yellow device, (I believe it's a capacitor), and thus, that's where it ends. This makes sense, since my reeplacement capacitor is working, and so is my inductor, but that yellow one is busted, causing a signal gap. Can someone confirm that this is a capacitor, and reccomend where to get a new one? Here's a picture focusing on it... http://postimg.org/image/5c29pn005/

    Leave a comment:


  • EuphoriX
    replied
    Re: Broken crybaby 535Q PLEASE HELP!!

    From what I can tell with the lighted pics, there's only 1 PCB track. By "Through the board" do you mean I should find a trace, drill a hole, feed a wire through, and solder on both sides?

    Leave a comment:


  • EuphoriX
    replied
    Re: Broken crybaby 535Q PLEASE HELP!!

    In an effor to show the traces and more of the PCB, I took 2 pictures of it agaisnt my bedlight... http://postimg.org/image/wopsco54r/ and http://postimg.org/image/tkf4fvocb/
    Last edited by EuphoriX; 11-11-2015, 07:20 PM.

    Leave a comment:


  • EuphoriX
    replied
    Re: Broken crybaby 535Q PLEASE HELP!!

    Originally posted by Kamanda~SD View Post
    I'll say it: Sure botched this one my friend.

    Good advice from hank there. Any wires you're adding in for a fix need to go through the board. Bust out your multimeter and check continuity to where your going to be soldering to an whatnot. That will allow you to test your 'trace fix' too. ALSO, the capacitor your replaced: Did you a) use the same value b)check the polarity and install correctly? Capacitors are polarized and their orientation is very important.

    Hopefully this turns into a good learning experience.
    The capacitor I used is 10uF instead of the original 20uF one. In truth, I didn't really need to replace it apprently, but I'm not very sure on how to know which end is which. I believe I did solder it correctly though.. shoudln't the lower hole be the negative? ... Anyways, I'm confused with what you mean by soldering to the bottom... do you mean the underside? as in the side facing the chassis of the pedal?

    Leave a comment:


  • Kamanda~SD
    replied
    Re: Broken crybaby 535Q PLEASE HELP!!

    I'll say it: Sure botched this one my friend.

    Good advice from hank there. Any wires you're adding in for a fix need to go through the board. Bust out your multimeter and check continuity to where your going to be soldering to an whatnot. That will allow you to test your 'trace fix' too. ALSO, the capacitor your replaced: Did you a) use the same value b)check the polarity and install correctly? Capacitors are polarized and their orientation is very important.

    Hopefully this turns into a good learning experience.

    Leave a comment:


  • Hank-
    replied
    Re: Broken crybaby 535Q PLEASE HELP!!

    No dont do that. It's hard to tell what all was connected to the inductor pads. I can't make out properly from the pic you posted. Remove the pcb out of the enclosure, hold a torch on the underside of the pcb, this will highlight all the traces around that area when you look at the components side from the top. Flip the board & use the torch to see on the other side for traces as well. There maybe more than one connection at the inductor pad terminals. Since those pads were removed/damaged you may have broken a connection between two traces meeting at a single pad point of the inductor.

    And when connecting a wire to replace a broken trace, solder to the underside of that board. Its all through hole components in there, solder to the correct component & terminal. Most importantly do a continuity test with a multimeter to check if the inductor is connected to all the points that it should be connecting around that area.

    Leave a comment:


  • EuphoriX
    replied
    Re: Broken crybaby 535Q PLEASE HELP!!

    So, you're saying I should solder the negative side of the inductor to the point where the 13 pin plug meets the PCB? Where exactly would that be? At the start of the trace? Then I'm assuming you suggest I de and resolder the wire to the cap leg?

    Leave a comment:

Working...
X