
 Tweet
Tweet
Originally posted by sparkplug
View Post

-
From what i've seen of *most* manufacturer stock coilsplitting methods, they don't attempt to provide hum-canceling results. Most send the series link pair of *both* pups to ground. Leaving both inner coils active but that's not hum-canceling.
Sanford: "The hardest part about tone chasing is losing the expectations associated with the hardware." -
cool, i'm happy to hear its been helpful.Originally posted by sparkplug View PostSanford: "The hardest part about tone chasing is losing the expectations associated with the hardware."Comment
-
If you are interested in understanding about how humbuckers are constructed and what about them leads to hum-canceling, read this.
Sanford: "The hardest part about tone chasing is losing the expectations associated with the hardware."Comment
-
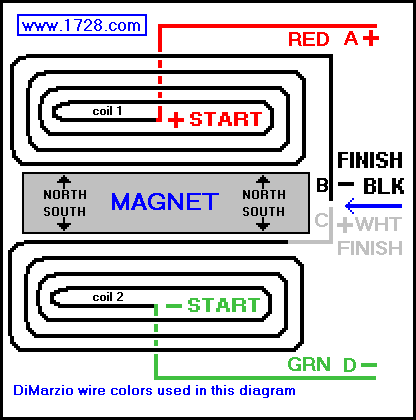
That 1728 guitar1b page and the guitar7 page were very helpful... Except that it refers to humbucker installations that have the screw coils on the outside of both pups as an EDGE CASE which isn't true at all. But after reading on that site, I think I'm going to try hooking up the tone pot like you did in the first diagram and see what happens. I might like it better than anything I've tried before, and if not (say for example, the middle position in this coil split mode has too high of output) then it won't take long to redo the tone pot wiring.
My last wiring job that I came to this forum for, I installed 3 way switches on both my JB and Jazz to select between either or both coils independently (in addition to the 3 way blade of course) and I wired the tone push/pull as a phase switcher for the bridge. I'm wondering now if I wired the bridge (JB) on that guitar "upside down" because that could explain some of my confusion too. Hopefully I come out of this mod with a very clear understanding of wtf is going on XD
EDIT: I confirmed that the on/of/on switches I installed on my ESP (the one with the JB and Jazz) are indeed backwards of each other. The neck on/off/on switch selects between neck/both/bridge coils, and the bridge on/off/on switch selects between bridge/both/neck coils.... That means that the switch for the bridge is visually the opposite of the other, and that misunderstanding had me confused about pickup wiring for like 4 years.Last edited by sparkplug; 04-10-2021, 04:53 PM.Comment
-
Cool, let us know how it turns outOriginally posted by sparkplug View PostSanford: "The hardest part about tone chasing is losing the expectations associated with the hardware."Comment
-
I plugged in my PRS, cranked the gain and treble and grabbed my loose tremolo arm and started tapping pickup coil magnets with it while adjusting switching. Coil split engaged, middle blade position, the 2 inside coils (slugs) are engaged. also, in neck or bridge blade position there is noticeable hum while coil split (facing the electronics/power stuff along the wall, that is) but when I put it in the middle position it quiets right up. Both of those coils are (probably?) North polarity, and are both slug coils (though one of them is 180 degrees of the other, hence the slugs coils being both inside coils). Does that check out...? verifying my understanding.Originally posted by Jack_TriPpEr View PostComment
-
Did you convert the wiring color code that i used in my diagram (seymour duncan) to PRS wiring color code?Sanford: "The hardest part about tone chasing is losing the expectations associated with the hardware."Comment
-
Sanford: "The hardest part about tone chasing is losing the expectations associated with the hardware."Comment
-
I just popped open my wiring compartment to check out how it's wired now that I have a little more context. It's a bit tricky to make out from this pic, but the heavy black wire with the red shrink wrap tip is the neck cable, and the one with the green shrink wrap is the bridge cable. the neck cable is sending red+black to split, green to ground, and white to the blade. the bridge cable is sending green+white to split, red to ground, and black to blade.
That pic you just posted of a PRS pickup wire legend confirms my suspicion that the PRS 85/15S pickups have a South/North/South/North current pattern (going from neck towards the bridge) but have the slugs and screws reversed on the neck pup just for aesthetics. The wire colors are different on these than in the pic you posted, but regardless, this is very telling!Last edited by sparkplug; 04-05-2021, 07:50 PM.Comment
-
If my analysis is right, I think that this means I want to wire the neck's red+black and the bridge's green+white to my on/on switch middle poles, and wire one end of that on/on switch to the middle poles of the tone pot switch, wire the top poles (i.e. "down" position) of the tone pot switch to the blade switch and the bottom poles (i.e. "up" position) to ground. (edit: basically the hand drawn partial diagram you made for me, except different pairs of series joint wires going to the on/on switch)
That should make it so that when the coil split switch is engaged, the outside coils (Neck screw coil, south; bridge screw coil, north) will be active, and when I pull up the tone pot, the inside coils (Neck slug coil, north; bridge slug coil, south) will be active. And since I'll have opposite polarity in either mode, I'll have hum bucking in the middle blade switch position while coil splitting.
Is that right/wrong?Last edited by sparkplug; 04-05-2021, 08:02 PM.Comment
-
I've been looking at various wiring diagrams of PRS pups online but have not found any that match what you describe (neck White wire = hot wire, and bridge black wire = hot wire).
I will resume research in the morning.Sanford: "The hardest part about tone chasing is losing the expectations associated with the hardware."Comment
-
Just so you know, this is a 2020 model. thanks JackOriginally posted by Jack_TriPpEr View Post
edit: I also got it used (technically) but in basically pristine condition and the wiring looks factory, not custom, so I don't think it was touched before.
Last edited by sparkplug; 04-06-2021, 08:24 AM.Comment
-
Sparkplug,
Took me awhile but i finally found a diagram that describes the wiring color code for 85/15 pups. Now you can do the color code conversion from my earlier diagram.Last edited by Jack_TriPpEr; 04-06-2021, 10:01 AM.Sanford: "The hardest part about tone chasing is losing the expectations associated with the hardware."Comment
-
That diagram makes great sense I think. So the neck pickup is just wired with reverse polarity out the gate.
I'm 100% likely to confuse myself trying to map that to the first diagram and verify that it's what I want... I think I'm better off thinking about this re-wiring as a modification of the existing circuit. To clarify, since the neck pickup is being run with reverse polarity (so that screw coil is north and inside/slug is south), my wiring of the tone pot will look (mostly) like the hand drawing you sent, correct? As opposed to the first diagram you sent which has the left and right lugs of the tone pot switch soldered asymmetrically instead of mirrored.Comment
-
reviewing your question, will get back to you shortlyOriginally posted by sparkplug View PostSanford: "The hardest part about tone chasing is losing the expectations associated with the hardware."Comment
Comment