Another Jazzmaster Project

Silence Kid

New member
Was going to just wait till finished, but may as well post this: Won't be a masterpiece necessarily, but wound up in another scenario where I have a bunch of spare parts that can be made into another guitar by purchasing just one linking piece:

List of parts I already have now & plan to use:
  • Mighty Mite Rosewood Strat neck/CBS Headstock (with tuners)
  • MIJ Jazzmaster bridge/Vibrato (both required repair; new Allparts saddles on the bridge, filed the pivot point on the vibrato and tested on another guitar to make sure it all keeps tune)
  • Wiring (Including spare Jazzmaster rhythm circuit and 1 megs)
  • Allparts white Pickguard
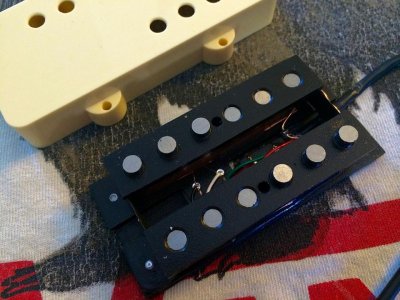
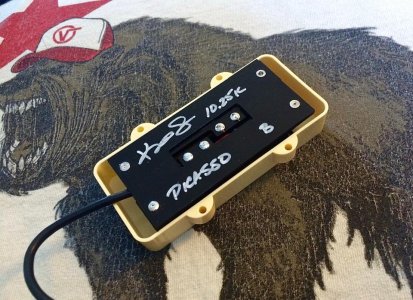
  • Rose Picasso bridge pickup (WRHB clone under Jazzmaster cover)
  • Duncan SJAG-1 neck pickup (will use under Jazzmaster cover)

Things I have on order:
  • Butchered Squier Mascis body (has lots of dents/bruises including poor over-spray)
  • Anodized pickguard (yeah I already have a pickguard, but...)
  • Duplicolor Nissan 'Orange Mist' metallic & clear

Upcoming Actions:
  • Figure out how forcibly the Nashville-style Tune-O-Matic posts were ejected, and whether a dowel & drill will be required to convert to a rocking bridge
  • Strip/fill/refin. the body as necessary (I'm thinking if it's nitro, I will not want to coat Duplicolor/Acrylic over that; sort of hoping it isn't stripped to wood underneath
  • Re-match the headstock (it's already the right color, but I used the wrong primer under it so it looks 100 years old; I don't like relics

The important bits:

qo8ikrhggmrene3cmgxl.jpg

IMG_9922.jpgIMG_1422.jpg
s-l1600.jpg

IMG-3101.jpg

3-A4-F14-F1-053-E-479-F-B45-F-F4-BACAA42078.jpg

71c0FVdmaoL._SX466_.jpg
 
Last edited:
Re: Another Jazzmaster Project

This does look like a fun project! Post more in-process pics as stuff comes in.
 
Re: Another Jazzmaster Project

Have the body - first order of business was figuring out the existing finish. It was previously stripped bare; there are some places the body-edge radius was not treated with much respect, but it’s mostly fine and will look better with a bit of effort.

The finish melts pretty easily with acetone, and seems dried pretty hard - it also smells terrible, not like I expected of nitro or even acrylic; more like an old school library smell. Contemplated sanding it to retain the surface as primer but probably just going to remove it all and start from scratch. The Tune-O-Matic bushings have something not far from the correct center for the rocking bridge but def. need doweling/re-drilling.
 
Re: Another Jazzmaster Project

New thought :)

A couple years ago when I didn't give a ****/wasn't paying attention, Staytrem released conversion bushings to do exactly what I am trying to do (and then quit making them.)The bridge post spacing is identical to the rocking bridge - both 2" 7/8 / ~74 mm.

The holes for the bridge mount on my body are actually intact. So... I purchased some stock Adjust-O-Matic mounting bushings; taking measurements there will be enough metal for me to drill these, and fit the standard Jaguar/Jazzmaster bridge cups within them. I could even cut the bushings somewhat short - all that's needed is for them to sit flush on the body, and for the cups to mount to the bushings flush in turn:

Screen-Shot-2019-10-17-at-8-10-30-PM.png


(Remember - I'm the one who once filed tuners/tuner bushings till they fit my Mustang without removing any wood.)

...Anyway, might as well throw in a worthless pic of the body as it sits; I also have paint on-hand, so it won't look this way for long:

IMG-4873.jpg
 
Re: Another Jazzmaster Project

Drilled a ferrule - it was slow going, since the hole I drilled wound up slightly small (intended) and I used a dremel to grind out the remainder (took longer than anticipated, but worked - need more sandpaper cylinders now to do bushing number two now.)

Perfect fit! :D Ignore how destroyed the thing looks from my vicegrips, and the leftover metal flash from the factory:

IMG-5665.jpg

IMG-5662.jpg


Actually ignore the crap finish I need to strip off this thing too:

IMG-5666.jpg


Hidden :) Need to do the next after a trip to the hardware store...

IMG-5668.jpg

IMG-5670.jpg
 
Re: Another Jazzmaster Project

Thanks - cheap Chinese, fits better than the allparts. Still wondering whether the gold actually belongs on my Sonic Blue Jazzmaster or if it will hang well on the metallic orange, but it will match the tuners.
 
Re: Another Jazzmaster Project

I didn't want to update yet, but looks like we're headed into the rainiest, coldest Thanksgiving on record in SoCal, so need to put my painting on hold - looks like about sixty and wet for the next week or so, very pissed :-/

I want/need one more clearcoat on the body before I sand/polish, but here's how the Sunmaster sits at the moment; in the meantime I have every part needed to put it together, so I may wire it:

F67-D867-F-CEE4-484-F-90-AD-E002317-C8744.jpg


Very difficult color to capture, two attempts made below (in comparison to the donor body for this project in the same shade)

53172-DAF-7307-4-E81-8550-A90-E869-FCFE2.jpg


16694-E31-FB14-4-D56-A32-F-A7-D5-F02737-B3.jpg
 
Re: Another Jazzmaster Project

Thanks! I just ordered two more gold pickguards from the same seller, in case I want to slap them on my other Jazzmasters or at least have a spare (anodized pickguards seem to wear quickly; I don't like wear.) They appear the same oem as the Mascis models in every way; incidentally another good thing about the Mascis is US pickguards fit perfectly, whereas a US pickguard on my Vintage Modified Jazzmaster won't without filing. Stock Mascis guards even use the US rhythm bracket spacing, which the VM doesn't.

Another minor minus to the anodized pickguard; they feel like aluminum siding on your fingers. But it is an awesome look; I may give my VM a makeover to look like this:

gtr51a.jpg


The color looks a lot better on a non-flat surface; looking forward to how the contours and curvy body emphasize. I sort of wanted a lighter/brighter orange tone, till I remembered how much of the muddiness of my original body was age-related:

32102139.jpg
 
Re: Another Jazzmaster Project

FYI the aluminum guard will shave off some of your highs, so keep that in mind if you don't like the sound.
 
Re: Another Jazzmaster Project

Yeah, shaving off highs is not exactly a bad thing with a Jazzmaster though.


The orange is nice and all . . . but . . .

410ifro48DL._SX466_.jpg


:P


How hard was it to do the headstock? Did you just tape off the edges and giv'er?
 
Re: Another Jazzmaster Project

FYI the aluminum guard will shave off some of your highs, so keep that in mind if you don't like the sound.

I made my first rookie mistake with the pickguard; assumed it would conduct electricity & obliviate a lot of ground wires. Turns out the pickguard doesn't have continuity - I assume the anodizing does this, because aluminum foil sure does have continuity. Had it wired nice and organized, now need to turn that on its head to make it work- grr. If I dislike it I'll swap to an Allparts I have- Totally don't mind if highs are shaved off.

How hard was it to do the headstock? Did you just tape off the edges and giv'er?

Yep - Primer/metallic/cleared it, same as the body. Since taking that pic I took a deep breath and scraped off some of the visible overspray on the headstock; luckily none of the front layer came off with it which is why I was hesitating. In the original 'before' pic. I used no primer and did much more a quickie job, so the result was much less impressive (let alone after over a decade as shown.)

Headstock's pretty glassy on the surface of the clear but in retrospect I wish I grain-filled/gave at least another coat of primer to the headstock, since at certain angles some grain is visible. I didn't think I'd need to do it on a maple headstock, but it's pretty much presentable and good enough. I planned on using an NSFW sort of sticker on the headstock anyway, but now I'm wondering about printing out a Squier logo that says 'Sunmaster' (I also have a Fender Jazzmaster decal if I feel like a liar, but 99% sure I will not use that.)

Also - Turns out no rain today, so I think I have what will be the last of the clear on the body.
 
Re: Another Jazzmaster Project

Now that I'm waiting for the body to dry, there's a can I've kicked without taking action and that's the neck. The pocket is severely under-sized for the Mighty Mite; I need to take a millimeter or maybe somewhat more off the pocket to get it to work.

I kept telling myself I'd take the easy way and enlarge the pocket, but obviously we're past where that should have occurred and I have no desire to mutilate the body for a sort of mediocre, non-spec Mighty Mite neck I'm ambivalent about - Last guitar I enlarged the pocket on to fit a neck I promptly switched to a different neck a year later and wound up with a millimeter gap :argh: If I ever want a real Mascis neck later (I might - they're nice) I'll screw myself over for short-term gain.

So - I'm pretty much going to say '**** this neck' that I'm only using because I own it, and either take a power sander/sanding block to the sides, starting at the point where it joins the body - 0.5 mm from each side should do it. I'll also need to re-file the fret ends after that business, and probably a coat of wipe-on poly to disguise however awful it looks somewhat. If I need encouragement to do that, my other makeshift-y fix on this guitar, the faux-Staytrem rocking conversion bushings, work *perfect.* The bridge seats dead-on, and no looseness (well - except the bridge itself rocking.) Guess I can make room for more crazy in this project.
 
Last edited:
Re: Another Jazzmaster Project

You don't actually need to sand the whole neck. Just the part that fits in the pocket. Make a small overhang with your sanding so you can leave all the fretwork alone.
 
Re: Another Jazzmaster Project

You don't actually need to sand the whole neck. Just the part that fits in the pocket. Make a small overhang with your sanding so you can leave all the fretwork alone.

Yeah - I wondered if that wouldn't look a bit too silly, but I'm thinking about it for the ease of things. The neck (like just about everything else on the guitar) had some initial issues I sorted out anyway; a crack/split in the heel I clamped/glued (pretty invisibly,) and spacers to fix a maxed out truss rod so it's not a masterpiece anyway.
 
Re: Another Jazzmaster Project

I would advise taking a smidge from both the neck and the body. Wrap some 220 around a paint stick or small file so you have a good flat surface. Use careful, purposeful stroke and count them. Repeat the same number on the other side. Check your fit often until it is snug.

Should you swap necks or whatever later, any minor gap can be filled with finish or ignored.
 
Re: Another Jazzmaster Project

I took some actual measurements - the base of the neck was somewhat ‘swollen’ compared to the upper portion; ten minutes of filing and it fits fine now without even looking visibly altered. Never mind.
 
Back
Top