Chinese PRS kit build

Re: Chinese PRS kit build

I've been kicking this idea around. I kinda like the open grain look. Will 10 coats fill in the grain? Can I get away with less?

Sent from my XT1097 using Tapatalk

I had 8 coats on a uke. Leveled the surface, put on the 9th and 10th coat to fill the last grains and polished the final coat with the finest steel wool. Then i used a guitar polish. I yielded a satin gloss.

On the grain filled neck i got the satin gloss with 3 coats, finest steel wool and guitar polish.
 
Re: Chinese PRS kit build

I had 8 coats on a uke. Leveled the surface, put on the 9th and 10th coat to fill the last grains and polished the final coat with the finest steel wool. Then i used a guitar polish. I yielded a satin gloss.

On the grain filled neck i got the satin gloss with 3 coats, finest steel wool and guitar polish.
Good call. I've also heard that it's helpful to dilute the oil as you get to the later coats, helps it go on smoother or something.

Still, I'm seriously considering leaving the grain open. It's got a certain sexiness to it.
cc6a3b2244c2481e568f0930e960884e.jpg


Sent from my XT1097 using Tapatalk
 
Re: Chinese PRS kit build

Progress. Sanding and staining. I mixed two colors of oil based wood stain to get the color, and it came out exactly like I hoped. I also stained the back of the guitar. The top was dyed with leather dye. The blue looks reddish now but should look normal once finish is applied.

I guess next up is fixing the frets then installing the neck.
c4fa635901741d14e780b5a009fe27bb.jpg
23c50aecbb56170761586c7110a19af4.jpg
2d94092230304edefbdd1695ccf396f9.jpg
5840bd321caa3dca66c7837441ab45d4.jpg


Sent from my XT1097 using Tapatalk
 
Re: Chinese PRS kit build

Thanks Mincer! I just hope I can get the frets to cooperate. Otherwise it will be one great wall decoration.

No idea on what pickups. I'm thinking something medium output. I guess I'll start with the spare Custom I have or something Duncan Designed and see how the wood responds. It also depends on the playability. If it's not a great player it's not getting great pickups.

Sent from my XT1097 using Tapatalk
 
Re: Chinese PRS kit build

If you have the money, you could test the new Amos set for the rest of us. ;)

But what I'm wondering is, how did you blend the colors in that finish?
 
Re: Chinese PRS kit build

If you have the money, you could test the new Amos set for the rest of us. ;)

But what I'm wondering is, how did you blend the colors in that finish?

Man, $375 is steep. Maybe Santa will contribute to the cause.

For the finish I coated 3/4 of the guitar in royal blue, then sanded it back to leave only the stripes on raw wood, more sanding for thin lines up top and progressively sanding less as I went down. To get the fade I applied the two colors in blocks, then used a rag to blend the sections over numerous passes. It took a while. At the top I diluted the turquoise with alcohol and faded it out. The colors should really pop once the finish goes on.

YouTuber Big D Guitars has some good tutorials using leather dye. Lots of fun to watch what he does, it inspired me to try this.

Sent from my XT1097 using Tapatalk
 
Re: Chinese PRS kit build

Man, that looks the ****.

Please do keep updating us with further results. Just drop whatever pickup first and check the results; you won't know for sure what the guitar wants until it's strung and ready to go.
 
Re: Chinese PRS kit build

The main thing you need to consider is how high you want the strings near the bridge, or where you play them. If the height of the strings ok where they are (or if you even want them slightly higher) then block up the bridge. But if they already feel too high to you, then you need to shave the neck heal down at a slight angle...about 1/16" - 1/8" (at most) at the bridge end of the heal and taper to zero at the neck end of the heal.
Is there a good way to do this without high risk of screwing up? I kicked around ideas for days but can't think of a realistic way of getting an accurate angle. Keep in mind that I don't have a lot of tools at my disposal.

I'm still open to trying this, but I had settled on a shim under the bridge cause it was easier. I know that will raise the strings off the body a little but I think I can live with that.

Sent from my XT1097 using Tapatalk
 
Re: Chinese PRS kit build

Since you're ok with the strings being high off the body, then the shim idea is the best/easiest solution for you.

If you find that this ends up not working out for you, you haven't hurt anything and can try filing down the heal of the neck later.
 
Re: Chinese PRS kit build

I've been working steadily on this build but haven't posted in a couple months. Here's a quick description of what I've done.

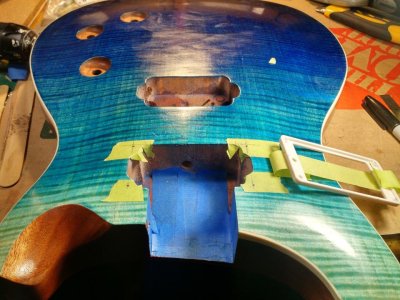
Finally got the dye job right after several attempts. I had to sand it down each time it didn't come out right, and luckily didn't wear through the veneer. The blue would dry with a red sheen, so it was tough to tell how the colors were blending. I found out I could put oil on it to get rid of the redness. I also created a headstock veneer and dyed it. Here's a decent shot of the end result.
IMG_20171231_012319879_HDR.jpg

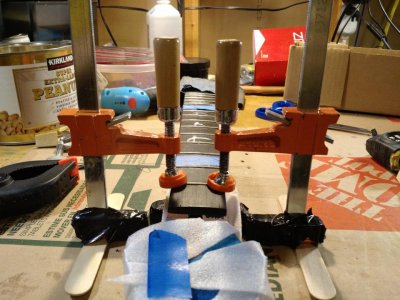
Next I moved on to the atrocious frets. I basically pulled them all up, super glued the slots, then put them back in. I was able to use a clamp to press the center of the frets down, but I had a hard time compensating for the curve. I jimmyrigged a couple clamps in to a makeshift press. It did enough to get the frets stable, but the ends were consistently higher than the middles. Lesson learned, I'll get a proper tool for this in the future.
IMG_20171223_025550731.jpg

The control cavity was routed out, but it had no ledge for a cover. I had to get creative with a Dremmel by creating a pseudo router, basically freehanding it. Turned out very well. I cut a piece of aluminum for the cover, and I'll be putting another dyed veneer on that. The neck was glued in after that.

Next I leveled the frets. I did a lot of research on DIY methods, and ended up buying a marble thresh-block-something-rather from Lowe's. A roll of sandpaper was impossible to find, even online, but I got lucky and found it at Harbor Freight. Also picked up a StewMac fret file on eBay for $35, which I'm happy about. Once I had all the tools for a proper level, I practiced on another guitar and got comfortable with the procedure. Now, the problem I mentioned about the frets not sitting evenly, this really screwed with the leveling. Basically, the frets were mostly level down the center of the neck. But with the ends sitting high on many of them, I ended up talking TONS of metal off. Yeah, this has been a learning experience.

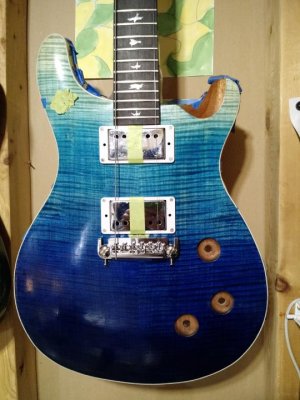
On to the bridge. After the debate about shimming the neck or the bridge to compensate for the angle, I decided to go with a wrap around. I drilled the holes and it fits magnificently. I strung up the high and low strings to check alignment, and the fret leveling appears to at least be consistent, even if it's ugly.
IMG_20180127_032210227.jpg

Now it's on to the clear coats. I'm using TruOil, and it's slow and tedious. So another couple weeks of daily coating, then polishing, and I should be able to move on to wiring and setup.
 
Last edited:
Re: Chinese PRS kit build

Looks great! Did you get new tuners as well as a new bridge? I'm assuming that, for those kits, you buy the neck and body, and expect to replace everything elsewhere?
 
Re: Chinese PRS kit build

Looks great! Did you get new tuners as well as a new bridge? I'm assuming that, for those kits, you buy the neck and body, and expect to replace everything elsewhere?
Thanks, I'm happy with how it's looking. The kit only came with the wood, no hardware. I picked up a used set of PRS SE tuners for cheap on the 'bay, thought it would be fitting.

Sent from my XT1097 using Tapatalk
 
Re: Chinese PRS kit build

Thanks, I'm happy with how it's looking. The kit only came with the wood, no hardware. I picked up a used set of PRS SE tuners for cheap on the 'bay, thought it would be fitting.

Sent from my XT1097 using Tapatalk

Fair enough, from what I've seen, people seem to chuck everything that isn't made of wood into a drawer and forget about it. Sometimes I browse kits, but I know I don't have the time, patience, or skill to do half of what you've done. I hope it sounds and plays as good as it looks when you're done.
 
Re: Chinese PRS kit build

I got the bridge installed and did a quick string-up to see how it plays. I discovered that the FRETBOARD IS UNEVEN! It looks like it was leveled poorly. Towards the bottom, the treble side has about an extra 1/16" in height. I guess that's the risk of buying Chinese parts haha.

It basically acts like a twisted fretboard. I guess my options are to pull the frets and sand it level with a radiused block, or to get a new fretboard.

Sent from my XT1097 using Tapatalk
 
Last edited:
Re: Chinese PRS kit build

Your dye job looks amazing, can I send you my latest project to finish for me? I keep seeing these cheap-0 kits and being tempted by them, but with my skill level, I'd end up with a wall hanger. You're gonna have a really nice guitar when you're done with yours!
 
Re: Chinese PRS kit build

If you end up pulling the frets go ahead and get the stainless steel frets
They last longer
They aren't as hard to work as everyone says

Stainless is gummy
It loads the file and seems like it has ruined it
A wire brush cleans it right up
Or filing some regular steel knocks it out
 
Re: Chinese PRS kit build

You did a fantastic job so far! The dye work is very impressive! I hope you get the uneven fretboard issue solved. If all else fails, perhaps you could entertain the idea of taking it to a luthier to see what it would cost to fix it. I'd hate for you to get this far, and just have a wall hanger and not be able to play it.
 
Back
Top