SomeLikeItHot
New member
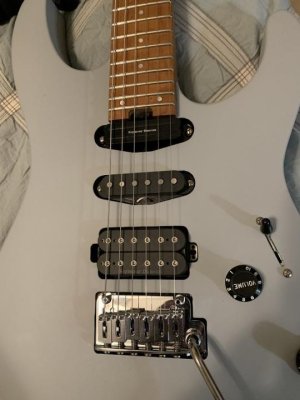
Or, I could name this: how to breath new life into a Charvel DK24 SSH! I mostly used the bridge humbucker when I played it. I did like the single coil in the neck, but found it was "un-balanced" to the bridge (SH-10). I would turn the volume up when using the neck, but that just introduced more noise. I was pretty frustrated. I even put it up for sale on C's list. Thankfully, no one bought it. This forced me to re-think how to make it better. I thought if I could raise the output, get a more balanced sound with the bridge, and cut the noise, I could learn to love it again. The necks are amazing on Charvels in general, but this one is excellent! (Once I had taken care of the fret sprout!) I thought about routing out the neck for a humbucker, (Don't laugh, I did it to an old Strat and it was great!) But after consulting with SD tech support, they recommended the Hot Rails Neck. I decided to take the chance. I bought it through Sweetwater and it was in my hands two days later. I found the whole process of replacing the neck single-coil with a Hot Rails to be straight-forward and not too intensive. (And well worth it!)
I basically did the following:
1) Removed the strings and control cavity plate. (You may want to "block" the tremolo, I didn't, and it took a while to tune to pitch.)
2) I carefully cut the zip tie off of the cables in the cavity.
3) I loosed the two screws holding in the neck pickup. I then carefully lifted the pickup out of it's cavity and removed the silicon tubing "springs" off the screws and removed the screws. (I used a washcloth to protect the top while I worked the pickup out.)
4) I located the two wires for the neck pickup in the cavity. I marked them with masking tape and took a picture with my phone to be sure I knew where they went on the switch and ground.
5) I de-soldered the two wires for the neck pickup. But didn't remove the pickup yet. I made sure the wires were separated from all the others and that I could pull, back and forth on the pickup and wires without resistance.
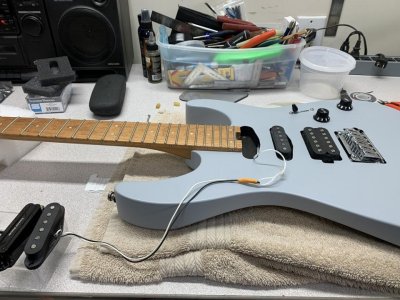
6) Using a 3' length of braided nylon string, I made loop in the string and a 'U' in the pickup's wire ends and secured the string/wires with tape. Not a lot, just enough to hold it secure.(See pics.) This way I would have a "pull-line" in the cavity and not have to remove the other pickups. (I did have to loosen the bridge pickup though, because it was too close to the body and not letting the wire pull through.)
7) I removed the old pickup, carefully pulling the wires and the "pull-line" underneath the other pickups. When the end of the line was just free of the neck cavity, I stopped pulling. I removed the old pickup wires from the end of the line.
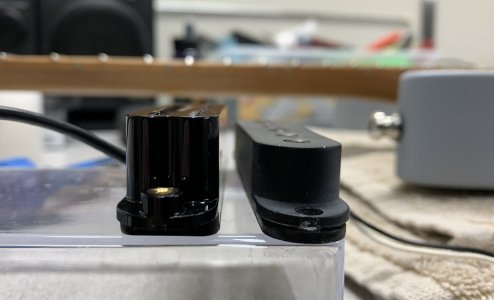
8) I then un-boxed the Hot Rails and compared the two pickups. The Hot Rails is significantly taller than the original single-coil, but that height is balanced against the mounting tab positions. It actually is only slightly taller than the original, once it is installed. This would be helpful, because another issue I had with the stock single-coil was not being able to raise it up closer to the strings. I had run out of "spring"...
9) I then faced the issue I had dreaded from the beginning, how to direct-mount a non-direct mounted pickup!
10) I made the decision to "drill-out" the brass, threaded portion of the Hot Rails (HR). I decided this based on the following: 1) the original pickup had a metal mounting plate with just a hole in it. The new HR pickup's housing is plastic (except for the brass threaded inserts). 2) I reasoned, that if I just drilled the threads out, I would still maintain the structural support of the HR mounting. 3) It seemed the easiest/safest method at the time. 4) It would provide the best "grip" for the mounting screws.
11) I first drilled-out the holes with a 1/8" drill bit, but that wasn't a large-enough hole (I believe the screws are #6). I then used a 9/64" bit and that provided good clearance without too much extra room. I carefully used an electric hand-drill to do the work, always keeping the drill straight and not applying a lot of pressure during drilling. I did trial-fit the screw and noticed that the screw stuck out way above the plastic. I did chamfer the top of the brass piece with a 5/16" bit (just a very light pressure, and only to angle the end).
12) I realized that the silicon tubing would be a little too long, so I cut-off about 1/8" off of each mounting "spring" before putting the original mounting screws and tubing on the HR.
13) I made a 'U' shape in the end of the HR's wires and put the exposed loop of the pull-line through and again secured it with tape.
14) I carefully pulled-back the line through the body, under the pickups and fed the new pickup wire in at the same time. I used the foam packing from the HR to protect the body while I did this.
15) Once through, I screwed the mounting screws back into the body and checked that the height was good. (Keep it lower to begin with, then raise it up.)
16) I followed the included wiring instructions and soldered the two wires where I had removed the original ones. (I also did a general cleanup and reduced the length of the existing cables which was just way too long.)
17) I reinstalled the cover and restrung it.
I can't begin to tell you the transformation that changing to the HR neck has made in this guitar. It is THE pickup for the neck position. It sounds fantastic! If you think the HR may be too hot, don't, - a trick I discovered is that you can raise or lower the pickup to achieve a perfect balance between balanced, high-output and distortion. Now, by using the volume, I can do warm jazz or hot rock. I'm loving every minute of it!
I basically did the following:
1) Removed the strings and control cavity plate. (You may want to "block" the tremolo, I didn't, and it took a while to tune to pitch.)
2) I carefully cut the zip tie off of the cables in the cavity.
3) I loosed the two screws holding in the neck pickup. I then carefully lifted the pickup out of it's cavity and removed the silicon tubing "springs" off the screws and removed the screws. (I used a washcloth to protect the top while I worked the pickup out.)
4) I located the two wires for the neck pickup in the cavity. I marked them with masking tape and took a picture with my phone to be sure I knew where they went on the switch and ground.
5) I de-soldered the two wires for the neck pickup. But didn't remove the pickup yet. I made sure the wires were separated from all the others and that I could pull, back and forth on the pickup and wires without resistance.
6) Using a 3' length of braided nylon string, I made loop in the string and a 'U' in the pickup's wire ends and secured the string/wires with tape. Not a lot, just enough to hold it secure.(See pics.) This way I would have a "pull-line" in the cavity and not have to remove the other pickups. (I did have to loosen the bridge pickup though, because it was too close to the body and not letting the wire pull through.)
7) I removed the old pickup, carefully pulling the wires and the "pull-line" underneath the other pickups. When the end of the line was just free of the neck cavity, I stopped pulling. I removed the old pickup wires from the end of the line.
8) I then un-boxed the Hot Rails and compared the two pickups. The Hot Rails is significantly taller than the original single-coil, but that height is balanced against the mounting tab positions. It actually is only slightly taller than the original, once it is installed. This would be helpful, because another issue I had with the stock single-coil was not being able to raise it up closer to the strings. I had run out of "spring"...
9) I then faced the issue I had dreaded from the beginning, how to direct-mount a non-direct mounted pickup!
10) I made the decision to "drill-out" the brass, threaded portion of the Hot Rails (HR). I decided this based on the following: 1) the original pickup had a metal mounting plate with just a hole in it. The new HR pickup's housing is plastic (except for the brass threaded inserts). 2) I reasoned, that if I just drilled the threads out, I would still maintain the structural support of the HR mounting. 3) It seemed the easiest/safest method at the time. 4) It would provide the best "grip" for the mounting screws.
11) I first drilled-out the holes with a 1/8" drill bit, but that wasn't a large-enough hole (I believe the screws are #6). I then used a 9/64" bit and that provided good clearance without too much extra room. I carefully used an electric hand-drill to do the work, always keeping the drill straight and not applying a lot of pressure during drilling. I did trial-fit the screw and noticed that the screw stuck out way above the plastic. I did chamfer the top of the brass piece with a 5/16" bit (just a very light pressure, and only to angle the end).
12) I realized that the silicon tubing would be a little too long, so I cut-off about 1/8" off of each mounting "spring" before putting the original mounting screws and tubing on the HR.
13) I made a 'U' shape in the end of the HR's wires and put the exposed loop of the pull-line through and again secured it with tape.
14) I carefully pulled-back the line through the body, under the pickups and fed the new pickup wire in at the same time. I used the foam packing from the HR to protect the body while I did this.
15) Once through, I screwed the mounting screws back into the body and checked that the height was good. (Keep it lower to begin with, then raise it up.)
16) I followed the included wiring instructions and soldered the two wires where I had removed the original ones. (I also did a general cleanup and reduced the length of the existing cables which was just way too long.)
17) I reinstalled the cover and restrung it.
I can't begin to tell you the transformation that changing to the HR neck has made in this guitar. It is THE pickup for the neck position. It sounds fantastic! If you think the HR may be too hot, don't, - a trick I discovered is that you can raise or lower the pickup to achieve a perfect balance between balanced, high-output and distortion. Now, by using the volume, I can do warm jazz or hot rock. I'm loving every minute of it!
Attachments


Last edited: