First attempt wiring. How does it look?

loversmoon

New member
,IMG_1059.jpgIMG_1060.jpgIMG_1061.jpgIMG_1062.jpg
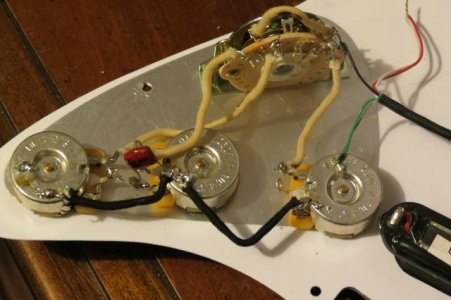
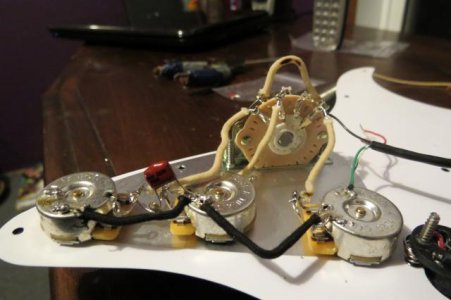
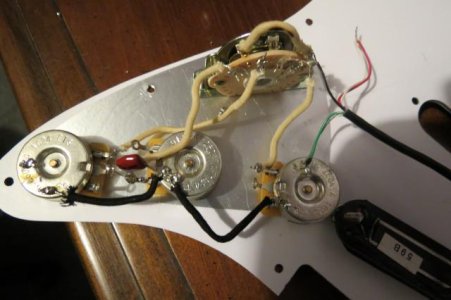
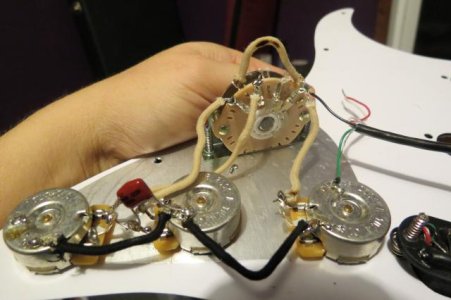
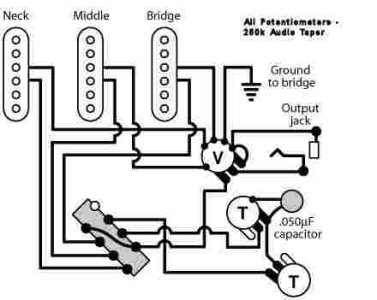
This is my first attempt at soldering. Its going to be a lil 59, texas special mid and texas special neck. I havent gotten middle and neck done as of yet. Just bridge and pots. I am praying I went from right diagram. I used the Seymour Duncan one for 1 humbucker, 2 singles, volume and two tones with a five way switch.
 
Last edited:
Re: First attempt wiring. How does it look?

I've definitely seen worse, and on production guitars too. Don't forget to tape off that red/white pair though.
 
Re: First attempt wiring. How does it look?

Impressive! My first attempt was um... Yeah.

But do you like it? I'm kinda addicted to soldering now.
 
Re: First attempt wiring. How does it look?

Not bad but...

You should always protect cap's legs (isolate them with heat shrink tube or isolant tape or whatever else); once you push down the pickguard, caps often change their position and, this can lead to some loose of high end.
Wrap a isolant tape around red&white wires so they cannot accidentally touch any ground spot or you will play with that pickup split without further notice.
Remove the ground jumpers from pot to pot, you don't need that. Your pots are in the same ground thru your pickguard steel foil. In that way, you are creating a ground loop and will potentially lead you to unwanted noise.
 
Re: First attempt wiring. How does it look?

Looks pretty good. You might stand to add just a touch more solder when making some of those connections. If it's blobbing up or rolling off, tilt the whole piece to make sure it flows where you need it to go. It looks like your iron is hot enough - the solder looks nice and shiny so I wouldn't expect you have any cold joints.

Are you using single-strand or multi-stranded wire there? Multi-strand will flex more easily without stressing joints, and may hold up better over time. You may also be able to get away with using a thinner gauge wire, but it's hard to tell from the pictures what you have there.

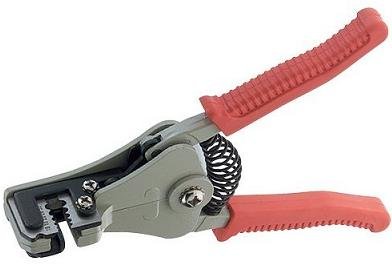
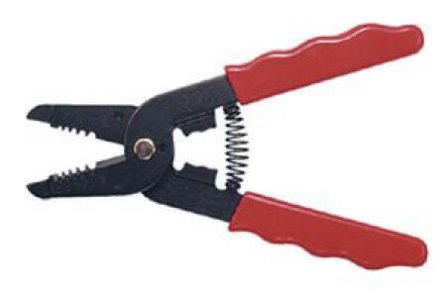
It also looks like you could consider investing in a wire stripper. It will cut the ends of the insulation more neatly and can prevent the insulation from peeling back, especially when you are soldering and the wire heats up. It will also help you to avoid cutting or nicking the wire when you strip the ends. The multi-action clamp-and-strip kind (pictured on the left) is great, but even an inexpensive cutter/stripper (on the right) will help you out a lot.

wirestripper_auto.jpg wire-strippers-side.jpg

Nice project. Have fun, and don't burn your fingertips!
 
Re: First attempt wiring. How does it look?

Thanks everyone. I did find that I enjoy the soldering work. I got frustrated cause when I was trying to ground the pots the solder kept wanting to ball up and dry before I had it where i wanted. I worry also that I got the switch too hot when trying to wire the black wire for the pickup. I will def tape the red and white ones off. and yeah I should have put something on the cap legs to protect it. i posted on another forum for feedback and They were not near as kind. Not rude, just constructive. Mostly on my soldering with the ground wire to pots. So that really isnt needed?
 
Re: First attempt wiring. How does it look?

Looks pretty good. You might stand to add just a touch more solder when making some of those connections. If it's blobbing up or rolling off, tilt the whole piece to make sure it flows where you need it to go. It looks like your iron is hot enough - the solder looks nice and shiny so I wouldn't expect you have any cold joints.

Are you using single-strand or multi-stranded wire there? Multi-strand will flex more easily without stressing joints, and may hold up better over time. You may also be able to get away with using a thinner gauge wire, but it's hard to tell from the pictures what you have there.

It also looks like you could consider investing in a wire stripper. It will cut the ends of the insulation more neatly and can prevent the insulation from peeling back, especially when you are soldering and the wire heats up. It will also help you to avoid cutting or nicking the wire when you strip the ends. The multi-action clamp-and-strip kind (pictured on the left) is great, but even an inexpensive cutter/stripper (on the right) will help you out a lot.

View attachment 35291 View attachment 35290

Nice project. Have fun, and don't burn your fingertips!

I was using the crappy solder that came with the gun from walmart. Prolly not the best idea. I have some with rosin coming as I was told I should redo the entire thing from another forum. I personally didnt feel it was that bad. Just in case its shot to crap i have new pots and wire coming as well. I do def need some wire strippers. That would have come in handy.

so what does a shop usually charge for wiring jobs??
 
Re: First attempt wiring. How does it look?

In that way, you are creating a ground loop and will potentially lead you to unwanted noise.
Myth! Imagine grounding to a large metal plate. And now you drill a hole in that plate. Ooh, look, a ground loop! No, that's not what a ground loop is. It's impossible to get a ground loop in a guitar. Everything is all already grounded to the same point - the sleeve of the jack.
 
Re: First attempt wiring. How does it look?

Im gonna leave the ground jumpers because almost everywhere i have seen this done calls for them. I may redo them with some better solder when it gets here. MY question is ...if u get a spot the switch a lil too warm will it damage it? when I was doing the bridge wire i think i may have gotten it slightly too hot.
 
Re: First attempt wiring. How does it look?

Myth! Imagine grounding to a large metal plate. And now you drill a hole in that plate. Ooh, look, a ground loop! No, that's not what a ground loop is. It's impossible to get a ground loop in a guitar. Everything is all already grounded to the same point - the sleeve of the jack.

Good point however you never know. It's better to have as few cables as possible, even fluorescent lambs can interfere with them.

Anyway see how it works and if it's ok, leave it.
 
Re: First attempt wiring. How does it look?

I don't know what a shop would charge to do that for you. I wouldn't necessarily rip it up and start from scratch; looks like you're doing alright so far.

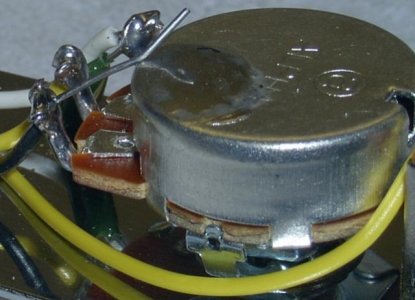
The foil will serve as your ground, so you can do without the black ground wires between the pot casings. But for that to work, you need to make sure the ground terminal of the pot is connected to the housing. To do this, bend the terminal around so it makes contact with the case and solder it in place as you have done on the rightmost pot. Or (see attached photo) strip extra length of wire for that connection and run it through far enough to be soldered to the case. (The photo shows the lead before it has been soldered to the case.)

You will need to connect the ground strap from the bridge or tremolo spring retainer somewhere, though. Usually connecting it directly to the output jack terminal is best and easiest.

When soldering to the pot casing, you may want to prep the area by scuffing with sandpaper. This will clean the area and provide better adhesion of the solder.

Also, when you're done make sure to remove any loose/unwanted blobs of solder before you hook it back up. Not so much the solder on the pot cans, but I see a small blob on the foil between the middle pot and the pickup selector switch. This could come loose inside the guitar and cause a short down the road.

The Wal*Mart solder is probably just fine, but it couldn't hurt to get a roll of "the good stuff."

vol_pot_soldering.jpg

You may also want to look at a pictorial wiring diagram to make sure you know what goes where.

StratSchematic_compressed.jpg
 
Re: First attempt wiring. How does it look?

I did ground the pot. you just cant see it in the pics. I pushed the eyelet back so it touched then ran the wire thru the eyelet so it touched the pot and soldered it all together.
 
Re: First attempt wiring. How does it look?

Myth! Imagine grounding to a large metal plate. And now you drill a hole in that plate. Ooh, look, a ground loop! No, that's not what a ground loop is. It's impossible to get a ground loop in a guitar. Everything is all already grounded to the same point - the sleeve of the jack.

Not really a myth, though mainly a theoretical concern. Any loop of metal can induce current, although in the example you cite it will not have a major effect on introducing noise. There is a reason why guitars are wired with *star* grounds.
 
Re: First attempt wiring. How does it look?

Not really a myth, though mainly a theoretical concern. Any loop of metal can induce current, although in the example you cite it will not have a major effect on introducing noise. There is a reason why guitars are wired with *star* grounds.

Yes that's correct about the loops, just it won't be due to differing ground potentials but another reason. The result however will be the same. ;)
 
Re: First attempt wiring. How does it look?

well upon inspecting my work a small piece of solder fell where it shouldnt preventing the switch from going into the fifth position. so now i get to try and heat it up a bit to remove it. ...or start with a new switch.
 
Re: First attempt wiring. How does it look?

well upon inspecting my work a small piece of solder fell where it shouldnt preventing the switch from going into the fifth position. so now i get to try and heat it up a bit to remove it. ...or start with a new switch.

no it's allright. Heat it up and you'll be ok. I f***ed up a pot once and couldn't make it move, the solder flew all the way inside it from a hole on the chassis. Well that was different....
 
Back
Top