So I took on an ambitious project for my first soldering job, and it ended up being a bit more than I could chew. Here's a quick breakdown of what I am doing:
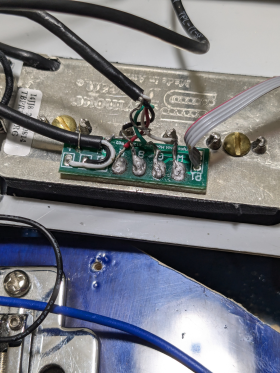
-Upgrading pickups in a Peavey Raptor EXP (HSS strat) to a Little 59' neck, a Custom Stack+ mid, and P-Rail bridge with Triple Shot mounting ring.
-Little '59 neck wired to a push-pull switch for Parallel setting on humbucker, then wired into another push-pull switch for "always on" setting (so when switch is pulled the neck is on in positions 1 and 2 of the pickup selector switch).
-Output of the guitar wired to a third push-pull switch that acts as a kill switch. (ie. When switch is pulled, it turns off the guitar for easy guitar muting in between songs on stage.)
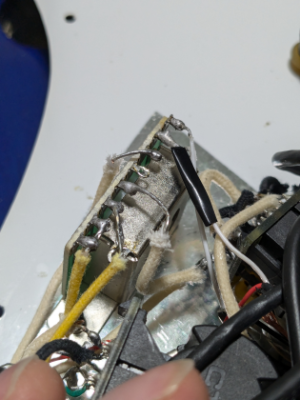
-For the pots I'm using CTS 500k push-pulls because I want that brighter tone. And I'm using a .0033uf mylar film caps on both tone knobs.
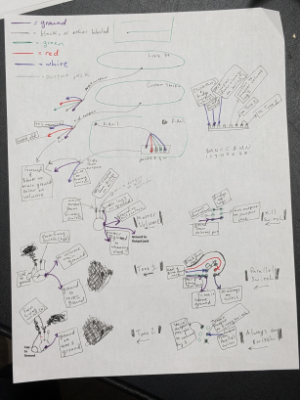
I did a lot of research and I believe that I had the wiring correct. Attachment 1 is the diagram I drew myself, excuse the messy handwriting. (I edited this in paint to add some correction I made as I went, since the paper is now probably illegible with all the notes I was taking on it haha.)
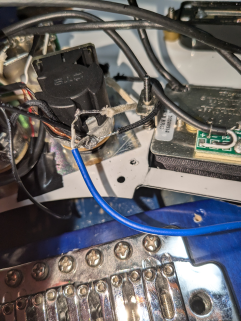
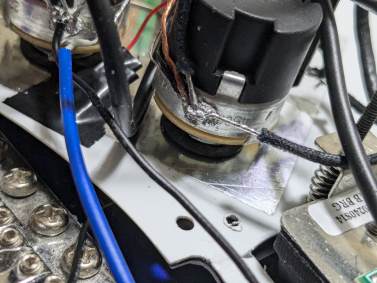
Anyway, yesterday I finished soldering everything up, and it was making a lot of noise when plugged into the amp. Putting my hand on the bridge didn't silence the buzz so I knew it was something to do with the bridge ground not working. I realized I had soldered it and the guitar jack ground to the tone pot instead of the volume pot by mistake, so I resoldered them to the correct spot. But now when I plug the guitar in there is zero sound. So I'm not sure what is going on.
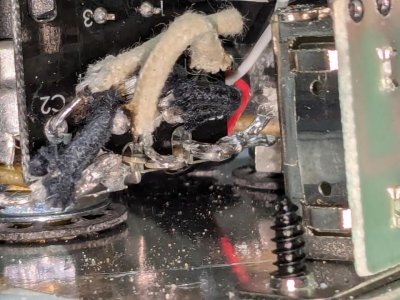
I had a lot of issues with the solder, so I'm wondering if that could be the problem. No matter what I did, the solder came out looking dull and gray. I'm also worried I might have damaged the triple shot motherboard. I've watched at least 20 "How to" videos, and do exactly the way they tell me to, at exactly the temps they recommend, but it consistently comes out looking like crap. My tip won't stay tinned, one of my tips even corroded so badly that it started to eat itself. And that's just in about 5 hours of soldering work. I know I got a cheap soldering iron but it should at least be able to survive a single project I'd think...
But when I had the ground wired incorrectly to the tone pot, I was able to test the humbuckers and they all made noise when I touched a screwdriver to them. There was just also a ton of background buzz. So it's weird to me that moving the ground broke the circuit somehow.
Also excuse the mess of wiring, I should have gone with thinner wires, I did not realize how thick these cloth ones were.
Edit: Finished! The problem was a cheap soldering iron tip and cheap solder. Also fixed some of the wiring. But it turned out sounding great!!
-Upgrading pickups in a Peavey Raptor EXP (HSS strat) to a Little 59' neck, a Custom Stack+ mid, and P-Rail bridge with Triple Shot mounting ring.
-Little '59 neck wired to a push-pull switch for Parallel setting on humbucker, then wired into another push-pull switch for "always on" setting (so when switch is pulled the neck is on in positions 1 and 2 of the pickup selector switch).
-Output of the guitar wired to a third push-pull switch that acts as a kill switch. (ie. When switch is pulled, it turns off the guitar for easy guitar muting in between songs on stage.)
-For the pots I'm using CTS 500k push-pulls because I want that brighter tone. And I'm using a .0033uf mylar film caps on both tone knobs.
I did a lot of research and I believe that I had the wiring correct. Attachment 1 is the diagram I drew myself, excuse the messy handwriting. (I edited this in paint to add some correction I made as I went, since the paper is now probably illegible with all the notes I was taking on it haha.)
Anyway, yesterday I finished soldering everything up, and it was making a lot of noise when plugged into the amp. Putting my hand on the bridge didn't silence the buzz so I knew it was something to do with the bridge ground not working. I realized I had soldered it and the guitar jack ground to the tone pot instead of the volume pot by mistake, so I resoldered them to the correct spot. But now when I plug the guitar in there is zero sound. So I'm not sure what is going on.
I had a lot of issues with the solder, so I'm wondering if that could be the problem. No matter what I did, the solder came out looking dull and gray. I'm also worried I might have damaged the triple shot motherboard. I've watched at least 20 "How to" videos, and do exactly the way they tell me to, at exactly the temps they recommend, but it consistently comes out looking like crap. My tip won't stay tinned, one of my tips even corroded so badly that it started to eat itself. And that's just in about 5 hours of soldering work. I know I got a cheap soldering iron but it should at least be able to survive a single project I'd think...
But when I had the ground wired incorrectly to the tone pot, I was able to test the humbuckers and they all made noise when I touched a screwdriver to them. There was just also a ton of background buzz. So it's weird to me that moving the ground broke the circuit somehow.
Also excuse the mess of wiring, I should have gone with thinner wires, I did not realize how thick these cloth ones were.
Edit: Finished! The problem was a cheap soldering iron tip and cheap solder. Also fixed some of the wiring. But it turned out sounding great!!
Attachments
Last edited: