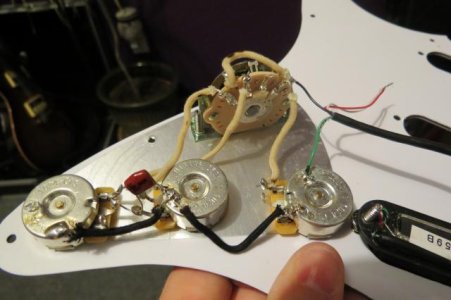
First attempt wiring. How does it look?

Re: First attempt wiring. How does it look?

Im gonna have a good friend of mine step in and look things over for me. He's been playing probably as long as Ive been alive so we will make this work. ;)
 
Re: First attempt wiring. How does it look?

Soldering to the back of pots is always tricky. You need to really scratch up the area where you want to solder with the tip of a knife or some sandpaper to remove the surface 'film' that works against getting a good join.

For tidying up messy solder work, a small roll of desoldering braid is very useful, and not expensive. It's a copper braid that you lay on the excess solder and then heat with the iron ... as the solder melts, it is drawn into the desoldering braid, which you then discard. It's a great product for cleaning pre-used parts and tidying up those times when you got too much solder on the job, or into places where you didn't want it to be.

But you've done a great job for your first attempt. Btw, you know you can test your wiring without having to string up the guitar, right ? When all your wiring is done (including connecting the output jack), you can connect the assembly to an amp with a normal guitar cable, dial up a little volume, and then tap the pickups' pole pieces with a small screwdriver. Assuming you've selected the right pickup with the switch, and turned the controls all the way up, you'll hear the metallic tapping coming through the amp. Keep tapping and rotate the controls to hear if they're working, then select another pickup position with the switch and repeat. It's even possible to hear if the tone controls are working using this method (tap the pickup while rotating the control form zero to maximum and back and listen closely, you'll hear the tone change)
 
Re: First attempt wiring. How does it look?

LOVERSMOON...

First of all, ignore just about everything in this following post!


Looks pretty good. You might stand to add just a touch more solder when making some of those connections. If it's blobbing up or rolling off, tilt the whole piece to make sure it flows where you need it to go. It looks like your iron is hot enough - the solder looks nice and shiny so I wouldn't expect you have any cold joints.

Are you using single-strand or multi-stranded wire there? Multi-strand will flex more easily without stressing joints, and may hold up better over time. You may also be able to get away with using a thinner gauge wire, but it's hard to tell from the pictures what you have there.

It also looks like you could consider investing in a wire stripper. It will cut the ends of the insulation more neatly and can prevent the insulation from peeling back, especially when you are soldering and the wire heats up. It will also help you to avoid cutting or nicking the wire when you strip the ends. The multi-action clamp-and-strip kind (pictured on the left) is great, but even an inexpensive cutter/stripper (on the right) will help you out a lot.

View attachment 35291 View attachment 35290

Nice project. Have fun, and don't burn your fingertips!


A little helpful criticism, not trying to be mean, I just want to help you do better.

You certainly DON'T need more solder. Your solder joints on the backs of the pots are very bad. They are DEFINITELY cold joints. Here's what that means: the solder itself got hot enough to melt and is nice and shiney, but the pots did not get hot. See how the solder blobs up into a ball. That is because the soldering iron did not contact the pot well enough to heat it up. When the pot back is hot enough the solder will flow like water, thin and smooth (not blobbed up in a ball). There are two things that will fascillitate this: HEAT (watts), and TIME. If you have a low wattage iron (less than 40 watts=low heat) you need to keep it in contact with the pot for a longer period of time to heat it up enough for the solder to melt and flow. Unfortunately, this allows the heat to diffuse throughout the pot and can also damage the pot (or switch). If you are using a high wattage iron (at least 40 watts) it will heat up a small area on the pot hot enough to get the solder to flow, in less time...before that heat disperses throughout the pot causing damage. Rule of thumb..."HIGH HEAT, SHORT AND SWEET". Also, ALWAYS heat the metal (back of pot, lugs, wire) that you want the solder to flow to not the solder. When the metal is hot enough, it will melt the solder and it will flow like water. When the solder is hot but not the metal, it will ball up on top of the metal (like it is on the backs of your pots). This is what is refered to as a :cold joint". Another rule of thumb..."MEAT FOLLOWS HEAT" (meaning that the solder will flow toward the sourse of the heat, or the hottest area).

The wire you are using is great. It is vintage cloth covered multistranded wire. Can't get much better than that. For wiring a Strat pickguard, it is perfectly fine to use solid wire instead of stranded wire if you want, since the guard holds everything rigid anyway. In fact solid wire actually works great in that application. The guage of wire you are using is perfect. No need to go thinner, although it won't hurt anything to go thinner (as low as 24 guage is fine, 18-22 is ideal).

As far as wire strippers are concerned. They work great!!.......on plastic coated/insulated wire. Not so great on vintage cloth covered wire. If you intend on continuing to use that wire, save your money on the stripper. Just cut the wire and "push back" the cloth covering. (Incidently, that is why this type of wire is sometimes refered to as "pushback" wire).

Insulating the wires on the cap is a good idea to prevent any possible shorts.

Finally.....your wiring job looks nice and neat. You have a good eye for detail and I'm sure that when you improve your soldering technique you will be doing some superb work that will be enveyed by many...and you'll actually enjoy it more since you will have no need to keep redoing poor solder joints. Do it right the first time and eliminate the second and third times.
 
Last edited:
Re: First attempt wiring. How does it look?

Soldering to the back of pots is always tricky. You need to really scratch up the area where you want to solder with the tip of a knife or some sandpaper to remove the surface 'film' that works against getting a good join.

For tidying up messy solder work, a small roll of desoldering braid is very useful, and not expensive. It's a copper braid that you lay on the excess solder and then heat with the iron ... as the solder melts, it is drawn into the desoldering braid, which you then discard. It's a great product for cleaning pre-used parts and tidying up those times when you got too much solder on the job, or into places where you didn't want it to be.

But you've done a great job for your first attempt. Btw, you know you can test your wiring without having to string up the guitar, right ? When all your wiring is done (including connecting the output jack), you can connect the assembly to an amp with a normal guitar cable, dial up a little volume, and then tap the pickups' pole pieces with a small screwdriver. Assuming you've selected the right pickup with the switch, and turned the controls all the way up, you'll hear the metallic tapping coming through the amp. Keep tapping and rotate the controls to hear if they're working, then select another pickup position with the switch and repeat. It's even possible to hear if the tone controls are working using this method (tap the pickup while rotating the control form zero to maximum and back and listen closely, you'll hear the tone change)

+1 Very good advice!
 
Re: First attempt wiring. How does it look?

LOVERSMOON...

First of all, ignore just about everything in this following post!


A little helpful criticism, not trying to be mean, I just want to help you do better.

You certainly DON'T need more solder. Your solder joints on the backs of the pots are very bad. They are DEFINITELY cold joints. Here's what that means: the solder itself got hot enough to melt and is nice and shiney, but the pots did not get hot. See how the solder blobs up into a ball. That is because the soldering iron did not contact the pot well enough to heat it up. When the pot back is hot enough the solder will flow like water, thin and smooth (not blobbed up in a ball). There are two things that will fascillitate this: HEAT (watts), and TIME. If you have a low wattage iron (less than 40 watts=low heat) you need to keep it in contact with the pot for a longer period of time to heat it up enough for the solder to melt and flow. Unfortunately, this allows the heat to diffuse throughout the pot and can also damage the pot (or switch). If you are using a high wattage iron (at least 40 watts) it will heat up a small area on the pot hot enough to get the solder to flow, in less time...before that heat disperses throughout the pot causing damage. Rule of thumb..."HIGH HEAT, SHORT AND SWEET". Also, ALWAYS heat the metal (back of pot, lugs, wire) that you want the solder to flow to not the solder. When the metal is hot enough, it will melt the solder and it will flow like water. When the solder is hot but not the metal, it will ball up on top of the metal (like it is on the backs of your pots). This is what is refered to as a :cold joint". Another rule of thumb..."MEAT FOLLOWS HEAT" (meaning that the solder will flow toward the sourse of the heat, or the hottest area).

The wire you are using is great. It is vintage cloth covered multistranded wire. Can't get much better than that. For wiring a Strat pickguard, it is perfectly fine to use solid wire instead of stranded wire if you want, since the guard holds everything rigid anyway. In fact solid wire actually works great in that application. The guage of wire you are using is perfect. No need to go thinner, although it won't hurt anything to go thinner (as low as 24 guage is fine, 18-22 is ideal).

As far as wire strippers are concerned. They work great!!.......on plastic coated/insulated wire. Not so great on vintage cloth covered wire. If you intend on continuing to use that wire, save your money on the stripper. Just cut the wire and "push back" the cloth covering. (Incidently, that is why this type of wire is sometimes refered to as "pushback" wire).

Insulating the wires on the cap is a good idea to prevent any possible shorts.

Finally.....your wiring job looks nice and neat. You have a good eye for detail and I'm sure that when you improve your soldering technique you will be doing some superb work that will be enveyed by many...and you'll actually enjoy it more since you will have no need to keep redoing poor solder joints. Do it right the first time and eliminate the second and third times.

When iwas complaining about wire i was referring to the solder wire maybe being cheap. Yeah im def going to redo the pots cause theysuck . Thank you for your reply and i dont take it as being mean at all. I take it as giving proper direction. Its all in the approach which you did very well. Its when people are unnecessarily rudethat ticks me off. :) i maybe didnt get the pots hot enough because i was afraid of damaging them
 
Last edited:
Re: First attempt wiring. How does it look?

I am very interested in these fluorescent lambs, they sound awesome and would be great fun. Do you have any pics ?
Actually I thought that was the term for all halogen lambs but maybe you mean those black light ones? Or maybe the blue fluorescent ones. Then yeah they are beautiful.

black light
220px-Black_light_bulb.jpg

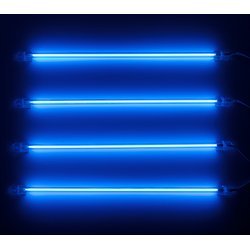
blue fluorescent
parallax-ccfl-12-fluorescent-lamps-4-pack-blue.jpg
 
Re: First attempt wiring. How does it look?

That's far better than my first try! I had a lot of trouble soldering to the backs of pots until I started roughing them up with sandpaper first - then it was easy.
 
Re: First attempt wiring. How does it look?

Ive heard not to rough them, to rough them. Either way those pots had me cussing real nice and proper
 
Re: First attempt wiring. How does it look?

Even tho it needs some work im proud of it. Ive seen some insanely messy wiring jobs.
 
Re: First attempt wiring. How does it look?

Ive heard not to rough them, to rough them. Either way those pots had me cussing real nice and proper

Not sure why anyone would say not to rough them up. It doesn't damage the pot in any way (certainly not more than cooking them with a soldering iron!) and it works.
 
Re: First attempt wiring. How does it look?

True that. Where ever i heard it said it was taking the finish off when it needed to be thereto stick. But im ll about easier and not turning my pot into a tom turkey!
 
Re: First attempt wiring. How does it look?

Ive heard not to rough them, to rough them. Either way those pots had me cussing real nice and proper

Get yourself a small tin of flux too. It really helps with getting solder to stick to metal. It's official purpose is to clean any dirt or impurities off the surface being soldered to.

It is also a good idea to 'tin' the pot first before you try and solder the wire to it. That means you are just getting some solder flowed onto the metal surface before connecting to it. You can do that to the stranded wire too; strip wire, give it a couple of twists, dip it in the flux, tin it, solder it to the component it's going on.
 
Re: First attempt wiring. How does it look?

Sanding the back of a pot will not hurt it in any way, shape, or form! It is sometimes NECESSARY to remove any oil residue from manufacturing the pot, or to remove the surface oxide layer so the solder will "stick".
 
Re: First attempt wiring. How does it look?

Sanding the back of a pot will not hurt it in any way, shape, or form! It is sometimes NECESSARY to remove any oil residue from manufacturing the pot, or to remove the surface oxide layer so the solder will "stick".

May have been someof the issue too. I just know whatever the case it didnt want to stick..better luck next time. With practice comes perfection
 
Re: First attempt wiring. How does it look?

IMG_1067.jpg

well second attempt to try and clean up the first. I cant tell if its better or worse. did get the switch so it will turn into all five slots now.
 
Back
Top