First parts build

playas

Well-known member
In a way I hate the idea of posting this here because it takes away some of my excuses for procrastination, but that's also a good reason in favour too...
Anyway, this is something I have been thinking about and it's a good time for it I reckon.

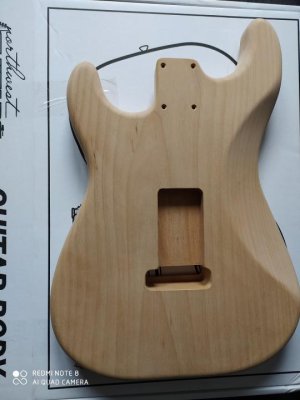
I recently picked up an alder body from Northwest guitars.

The idea is to put together a vintage 'style' 3 tone sunburst strat.

'Style' because I am absolutely not trying to make a strict copy of a vintage guitar and it will not be reliced. I just want something that feels comfortable, has a decent finish (i.e. not thick poly) and looks superficially like an older sunburst strat and if at all possible, resonates well. I've no problem with it picking up a natural relic later, but won't do anything to beat up the guitar.

FYI I haven't been able to upload pics yet, but I will do asap.

I am hoping to get a local guy to paint the body in sunburst once I have all necessary drilling and sanding done, but if that doesn't work out I will try my hand at finishing it myself.

It will be my first build and my first SSS strat. I have a pickup set ready and the neck is a maple neck I bought here on the forum some time ago.

I've had it several years but despite having it on a guitar I never put a finish on it. I have decided to put the original neck back on that guitar and use the maple neck for a new parts build.

Unfortunately, the majority of the remaining parts were delayed as I ordered them in the same place and one of them was back ordered. I'll be using the time for sanding the body and preparing the neck.

I'll continue to add to this as I go.
 

Attachments

  • FrontAlderBody.jpg
    FrontAlderBody.jpg
    64.2 KB · Views: 0
  • BackAlderBodyjpg.jpg
    BackAlderBodyjpg.jpg
    36.4 KB · Views: 0
I managed to upload a couple of pics of the body in the first post above.

They're from when it arrived - not that I´ve done much sanding yet in any case.

It was sold as a two-piece Alder body, but I don´t see any joint. No complaints either way.

The pickups are a Bareknucle Apache set with a baseplate on the bridge pickup. I´m very keen to hear how they sound.

I spent some time rolling the fret-ends and the edges of the fretboard as the fret-ends had been annoying me. I used masking tape to cover the fretboard and filed the edges with a fine, flat, file. Then I used the corner of a sanding sponge and went over it again to smooth it a bit more.

After I removed the tape, I used a screwdriver shaft to roll the fingerboard.

Not sure that´s necessarily the best way to do it or that I´ve done the most amazing job but it certainly feels a lot better that it was before.
Let´s see if it makes a big difference to the way it actually plays once it´s all put together.

I haven´t polished the frets and I probably won´t, although I may possibly give it another once-over before I consider that finished.

I´ll just use the tuners and nut I had on there at first. I'll eventually need to replace the tuners as they´ll need to go back on the other guitar they came from at some stage but there's no hurry with that for now.
 
I will be starting a new build in the new year, too. I'll start a thread when it gets closer to getting the parts.
 
What Trem and Tuners?

My personal choice: Schaller locking and a Wilkinson V100. Best damn thing I ever played. That alone was reason enough why I should have never sold that Yamaha Pacifica...
 
I am a big fan of the Wilkinson. The Super Vee Blade Runner is another great one. I dig Hipshot open locking tuners.
 
I have a Gotoh vintage style six point trem ordered, but I haven´t decided on the tuners yet.

The neck currently has a set of black Gotoh mini 510 locking tuners as the guitar that neck was on has all black hardware. (I actually have a Wilkinson / Gotoh VS-100 for that but haven´t currently got access to an adequate workspace to do the routing needed for the body to accept it.)

I´m not crazy about the locking mechanism on those as it seems to take longer to string them (unless you have three hands on the job - one to pull the string, one to turn the tuner and one to hold the screwdriver in place to hold the lock).
My preference is the thumb screw on the back, seems much more comfortable and quicker.

Have been contemplating possibly these tuners but still open to suggestions.
https://www.gear4music.es/en/Guitar...M-L6-MG-T-Locking-Tuners-Set-of-6-Nickel/34Z1

I have a few days off next week before any other parts arrive, so I´ll concentrate on sanding down the body.
 
Never used those locking tuners. I prefer any locking tuners over non-locking, and it helps if they are staggered on a flat headstock without string trees. I do look for lightweight tuners, though, so generally Schaller and Sperzel are are out.
 
The neck currently has a set of black Gotoh mini 510 locking tuners as the guitar that neck was on has all black hardware. (I actually have a Wilkinson / Gotoh VS-100 for that but haven´t currently got access to an adequate workspace to do the routing needed for the body to accept it.)

I´m not crazy about the locking mechanism on those as it seems to take longer to string them (unless you have three hands on the job - one to pull the string, one to turn the tuner and one to hold the screwdriver in place to hold the lock).
My preference is the thumb screw on the back, seems much more comfortable and quicker.

The tuners on my SG Standard have a similar locking mechanism. I thought you needed a screwdriver at first, but you really don't and it frequently is easier not to use one. At least on my SG I find that the mechanism self-locks when tuning up, as it self unlocks when removing the strings during a change.
 
The neck currently has a set of black Gotoh mini 510 locking tuners as the guitar that neck was on has all black hardware. (I actually have a Wilkinson / Gotoh VS-100 for that but haven´t currently got access to an adequate workspace to do the routing needed for the body to accept it.)

I´m not crazy about the locking mechanism on those as it seems to take longer to string them (unless you have three hands on the job - one to pull the string, one to turn the tuner and one to hold the screwdriver in place to hold the lock). My preference is the thumb screw on the back, seems much more comfortable and quicker.

I thought the 510s were supposed to pinch the string in place as you turned the tuner, there's nowhere I've seen where a screwdriver is necessary.
 
In my ever-so-humble opinion, old school tuners where the end of the string goes down into the post are the best locking tuners. If you’re like me and you swap out parts a lot, you can remove and reinstall the strings many times without deforming the wraps at the end. Every locking tuner I’ve tried breaks the string at the tuner after one or two times.
 
Here are a few pics of the neck I´ll be using, after rolling the fretboard / fret ends.

Guitar_Neck.jpg

frets.jpg

Most of the parts have now arrived, including the bridge so I have been measuring centrelines etc. trying to get the bridge position set.

Unfortunately I have come up against a couple of issues.

First is that the neck is anything but a snug fit. Body and neck still need to be finished, but I think I´ll need to sand the heel down the tiniest bit to fit the curve of the body so it will eventually sit more snugly.

Second is the fit of the trem. When measuring the 647.7mm (25.5") to mark the position of the bridge, from what I have read the 6 screw hole positions should be at exactly that point.

This always seemed counter-intuitive to me as the holes are ahead of the point where the strings bend over the saddles. Surely the measurements should be from roughly the centre of the range of movement of the saddles, to the nut....i.e. the two points from which the strings stretch. Am I wrong here? Also I checked using a different neck and the measurements are different, but closer to the saddle position than the tremolo post (/screw hole) position with both necks.

So if I were to allow for that I would need to completely re-route the tremolo cavity further back. As is, the line I have marked matches closer to the actual saddle position.

Any suggestions and comments welcome, especially constructive ones.
 
  • Like
Reactions: Kac
The saddles being at the 25.5" mark makes more sense to me. I'll measure a couple of my Fenders and see what they say.
 
On my other guitars of that scale length (none of which are Fender strats), 25.5" roughly aligns with the saddles rather than the bridge posts.
 
Last edited:
So after a very small amount of sanding the heel of the neck with 180 grit sandpaper it seems to fit much better into the recess - albeit with more space than I would like between the neck and upper cutaway. Nevertheless it seems to sit very solidly into the pocket. If anything needs to be done there I will address it later.

I had to borrow a drill for the bridge post mounting screws etc.

They say measure twice and cut once. I reckon I must have measured at least 5 times along with lots of additional measurements to ensure that the holes are correctly aligned along the centre-line and parrallel to the bridge route and with the right distance between the mounting holes and the saddles to allow for correct intonation.

I´m not sure if it´s typical, but to try and ensure that I had the maximum possible leeway for intonation, I set the first and second saddles at the opposite extremes of their range, and the same for the fifth and sixth, then used that as a rough guide for the 25.5" mark.
There is actually a bit more range on the bass side saddles, so it´s not exactly perfectly parrallel, but I was able to get a clear idea of distance from there.

I then measured from there to the centre of the screw holes in order to compensate for the distance from the screw holes to the actual 25.5" mark.
I happen to have a stew mac bridge routing template which came in really useful as it has markings for a 6 hole bridge as well as the 2 post that I originally bought it for, so that allowed me to position the holes properly for drilling.

I was probably a bit paranoid with intonation and getting the bridge holes properly drilled (I guess that´s normally done before-hand on a parts build). In any case, I taped down the template and used a 2mm drill bit by hand to mark the positions of each of the holes starting with the 2 outer ones, then the four inners. Once I was happy all the holes would align properly, I removed the template and I drilled to depth (a bit less then the thread length of the screws) with the 2mm bit for all 6 (again starting with the two outer holes.) only after I was happy with those I drilled to 2.5mm and threaded with the screws

drilled for bridge.jpg
In the picture the holes are drilled and threaded. I´m pretty happy that I have done a good job of it. It´s the part I was most concerned with messing up. You can see the outer two holes are a little wider as I hadn´t screwed the 4 inner screws down completely (on purpose).

With all the measurements concentrated on intonation, it didn´t occur to me to check the scratchplate.

As you can see, it doesn´t fit: :smack:
scratchplate.jpg

To be honest, I´d rather have the intonation correct and have to file / sand down the scratchplate a bit around the neck cutout. I don´t imagine it will be a major problem.

I had thought I´d be able to get the scratchplate holes drilled fairly quickly once I finished with the bridge holes though it´ll most likely take me a few days to get to it now.
I also have the two output jack holes and two trem claw holes to drill.
 
  • Like
Reactions: Kac
Quick update:

I got all the holes drilled pretty quickly, but then with lockdowns I wasn't able to get it to the luthier for painting so decided to work on the contours.

... also still waiting for the solder I ordered before Christmas ☹️

All the other parts arrived (eventually) but the solder was out of stock so I still haven't been able to wire the pickguard. I'm really curious to know what the pickups sound like.

I'm hoping to have a bit more time over the weekend to file and sand the elbow and waist contours as they're both pretty small. After a lot of time sanding I took a fine file to it, but still have lots of work to do to get it where I want it.
 
Back
Top