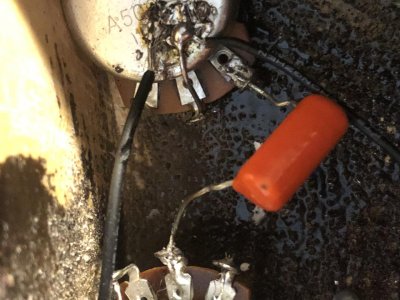
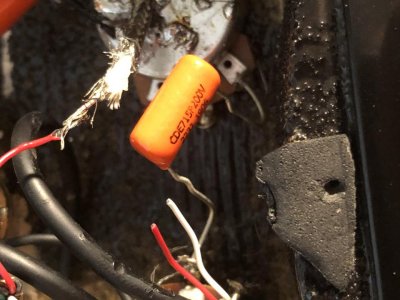
First wiring attempt gone wrong. HELP!

Dauminator

New member
I recently purchased a Les Paul body as a project to learn how to work on guitars, and I've gotten everything down except the wiring. I thought I followed the diagram properly
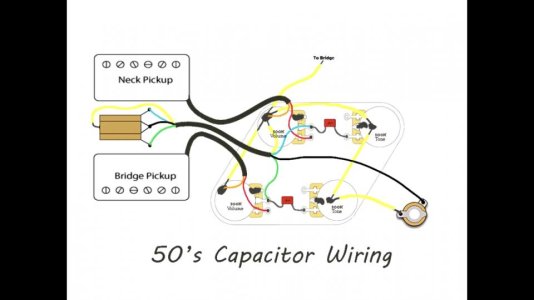
IMG_0311.jpg
but when I plug it in it buzzes like it's not grounded and the pickups barely make any sound if at all. This is a learning build so I used parts I had laying around (that all worked when I took them off) and the pickups are GFS Crunchy Pats off one of their guitars I'm working on. This is also my first real soldering attempt too and I bought that orange weller station for like $35, and a spool of .8mm 60/40 Lead Tin solder. Now onto the pics

This is the ground wire coming from the guitar onto the back of the neck volume pot
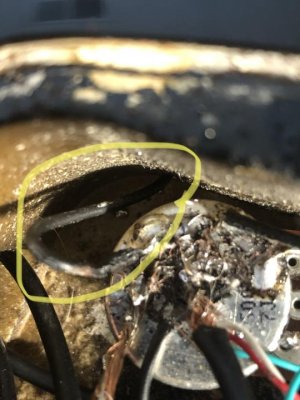
IMG_0313(Edited).jpg

This pic is the ground wire from the neck volume to the neck tone
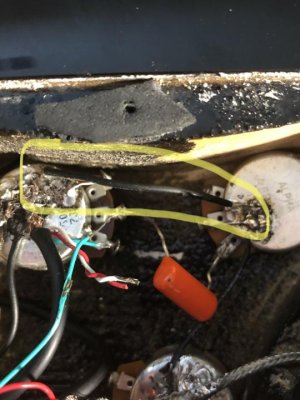
IMG_0314(Edited).jpg

This pic is the ground wire from the neck tone to the bridge tone, as well as the ground from the output jack to the bridge tone (The braided cable wire itself is the ground)
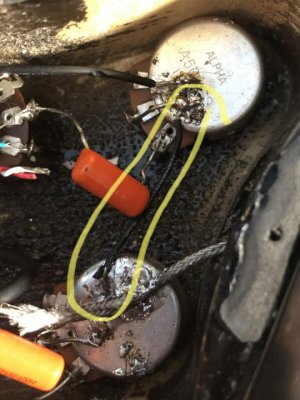
IMG_0315(Edited).jpg

This pic is the ground from the neck volume to the bridge volume
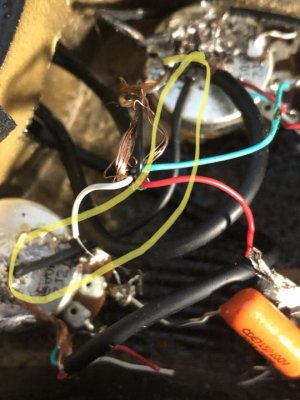
IMG_0316(Edited).jpg

This pic is the toggle switch to the bridge volume (white wire)
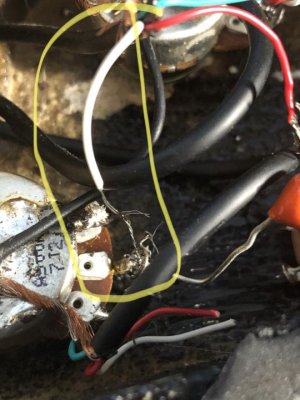
IMG_0317(Edited).jpg

This pic is the toggle switch to the neck volume (right green wire)
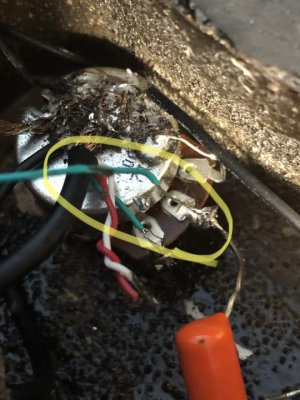
IMG_0319(Edited).jpg

This pic is the bridge pickup ground and lead on the bridge volume pot (red and white wires are for coil splitting and are not used)
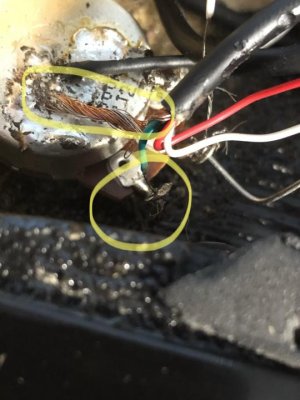
IMG_0320(Edited).jpg

This pic is the neck pickups ground and lead on the neck volume pot
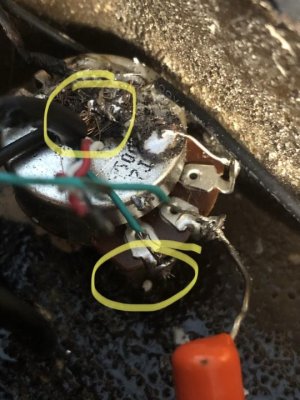
IMG_0321(Edited).jpg

This is the neck to neck capacitor
IMG_0322.jpg

(Can only post 10 pictures per post so I will continue in a comment below)
 
Last edited:
Re: First wiring attempt gone wrong. HELP!

This is the bridge to bridge capacitor
IMG_0323.jpg

this is the toggle switch to the output jack
IMG_0324(Edited).jpg

I also grounded the post to each other where the diagram shows. This is the video I watched https://www.youtube.com/watch?v=agiuo02m8aY&list=LLgaSu4RbOly92NVZQ09Akow&index=5&t=0s

I honestly have no idea where I went wrong. I have a multi meter and everything from the output jack to the tuners to the pots to the pole pieces on the pickups are grounded, so I have no idea what could be the issue. The pickups worked great in the guitar I took them out of. Any advice would be awesome!
 
Last edited:
Re: First wiring attempt gone wrong. HELP!

Sorry, dude, but none of those connections looks good. I’m surprised you’re getting ground hum.

What are the red/white wires that are twisted and not connected to anything? If those are pickup wires, your pickups will never make sound.

You might want to buy a plain piece of aluminum and some spare guitar wire and just practice soldering, without ruining a pot or switch.
 
Re: First wiring attempt gone wrong. HELP!

The red and white wires have to be stripped and soldered TO EACH OTHER. The pickups cannot work until those wires are connected to each other.

(For each pickup: neck pickup red to neck pickup white, tape it so they don't touch anything else. Then same for bridge pickup.)

After that you should get sound. Then what you need is to watch some YouTube videos about stripping wires and soldering them. You have some very tenuous connections there, with only one strand of wire actually making contact. That's not good.
 
Re: First wiring attempt gone wrong. HELP!

The previous comments from my forumite bros were extremely kind, but they didn't really give you any idea how bad this soldering job is and what you need to do to correct it.

First of all...reality check.
Please understand that this comment is not at all intended as a personal insult or to make you feel bad, but simply my observation of your pics and my desire to help you - in 60 years of working on guitars this is by far the worst soldering I have ever seen. Previously, the worst job I have seen, which was totally appalling, would look amazingly good compared to yours. You have numerous cold solder joints, broken wire strands everywhere, unshielded areas on wires possibly shorting to other wires/lugs/metal parts, bird's nest globs of wire strands mingled with solder, etc.

I posted a short tutorial which could help you.
https://forum.seymourduncan.com/sho...t-Solder-Joints&highlight=soldering+with+pics

Also, I posted several pictures showing what good and bad solder joints look like. I don't remember what that post was titled, but it was shortly after this tutorial. You might be able to find it in a search. By comparing those pics to yours, you will learn a lot (even my bad examples were better than your soldering job).

My advice to you at this point would be to read what I posted, look at the pics I posted in a separate thread, and practice soldering a bit before working on your guitar (don't practice on aluminum, that's tricky to get good soldering results, use a thin piece of copper or iron/steel).
 
Last edited:
Re: First wiring attempt gone wrong. HELP!

Thank you all for being kind to a new member.
I would also suggest to possibly find a mentor who can help with the skill of soldering. While we can sort of talk you through this a bit, I think what we need to do before working on this project is some practice. I'd scrap everything and use the pots to practice soldering with some wire. Do this before you start sorting out the wiring on the guitar.
My thought is that you might not realize how fast the soldering process really is.
 
Re: First wiring attempt gone wrong. HELP!

There are plenty of tutorials on the web. Check them out and practice.

By the way, your diagram is just fine.
 
Re: First wiring attempt gone wrong. HELP!

All the comments about soldering are true, but it MIGHT actually work if those red and white wires were connected to each other!
Right now your pickups are only half-connected: you have the hot and the ground but leaving the white and red wires apart means no actual signal is leaving the pickups.
 
Re: First wiring attempt gone wrong. HELP!

Well I guess I gotta start somewhere! This body/neck has been sitting idle since December and I because I'm still in school I planned for it to be a summer project, but with this quarantine i figured I'd give it a shot. I bought a weller solderning station and solder and I had pots and wires laying around, and I thought just watching the diagram video was going to be enough but I'm coming to terms with that wasn't the best plan. What's probably worse is I did this on my bedroom floor because it was all I had when I did this. I did the back pot first, and it's obviously awful, but I grounded the pots to each other last and I think those actually don't look too bad. Since then I've gotten some advice on tinning wires from friends who are electrical engineer majors and they've been helpful. We also cleaned out our garage and found a desk that'll work for a guitar work station and I plan on going back and fixing it. My question now is where do I start? Like do I unsolder everything and start completely over or is there anything I can salvage? I think I can keep the pot grounds and caps but I know virtually nothing compared to yall lol. Can't thank you enough for the help
 
Re: First wiring attempt gone wrong. HELP!

You can use a lot of heat for pot backs to make it easier and just dominate and create a good bond since there's no risk of damaging anything. Unless you use such extreme heat to disintegrate the wires. For pot lugs, use just the appropriate amount of heat so it doesn't break it.

What I do to evaluate a joint is tug on the wire to see if it's joined well and examine it visually to see if the solder looks solid and not all degraded and that there's reasonable contact in the connection.
 
Last edited:
Re: First wiring attempt gone wrong. HELP!

Holy hell!!!

Yep......some tutorial watching + a few hours of practice before starting again.....and a complete re-do is needed. If your soldering station is not a 45-50W, then that power will be needed. You certainly will need every wire to be replaced, and you could well have killed the pots too by cooking them.

edit - the enclosed space of a cavity is hard, and you can burn insulation if you don't attend to order, and the angle of your iron. Its best to work on the lower joints first. So the grounded pot lugs and any ground linking the pot backs and capacitors. Then work on the pickups onto the pots, and the wires to the switch if they go out of the cavity to a separate one like in a Les Paul.
The last bit is routing the output wire through to the jack.
 
Last edited:
Re: First wiring attempt gone wrong. HELP!

What I do to evaluate a joint is tug on the wire to see if it's joined well and examine it visually to see if the solder looks solid and not all degraded and that there's reasonable contact in the connection.

The connections to the lugs are solid, at least from what I can tell. I tugged on every one and they seem well connected. I guess most of my issues are the cold connections and the red+white wires
 
Re: First wiring attempt gone wrong. HELP!

Tugging on them means nothing.
You need a multimeter to check that they are making an electrical connection
 
Re: First wiring attempt gone wrong. HELP!

You can pretty much ignore Clint's last post. Too much heat for too long can indeed damage a pot. Tugging on a wire tells you nothing. And visually inspecting your work after you have soldered it is almost useless...you need to know what you're doing and watch the solder AS you are soldering.

If you know what you are doing and pay attention to each solder joint while you are doing it, making sure it is done correctly in the first place, is the key. Don't just slap it together and hope that it will work correctly when you are done. Miracles really don't happen with solder...and then it will be an absolute nightmare trying to find out what is wrong and correcting it after the fact.
 
Last edited:
Re: First wiring attempt gone wrong. HELP!

Also,
As Alex suggested, a COMPLETE redo is called for. Remove every wire and all solder using this type of wick (https://www.amazon.com/NTE-Electron...=1&keywords=solder+wick&qid=1588087475&sr=8-3), then start over. It's also a good idea to get some new stranded pre-tinned wire. This stuff is good...https://www.amazon.com/Stranded-dif...keywords=stranded+wire&qid=1588087704&sr=8-11. But this stuff with flexible silicone insulation is excellent...https://www.amazon.com/Electrical-F...1-5-12d4272d-8adb-4121-8624-135149aa9081&th=1
 
Re: First wiring attempt gone wrong. HELP!

All is not lost, though. Use the old parts to practice a bit. Things get easier with a good iron, good wire, and better technique. You want to avoid large places where there is bare wire- only a small portion of the insulation needs to be pushed back or soldered. I think, in all likelihood, it seems like you are working way too hard here.
 
Re: First wiring attempt gone wrong. HELP!

You can pretty much ignore Clint's last post.

Why would that be?

Too much heat for too long can indeed damage a pot.

Reread my post. I said pot lugs can be broken from too much heat. I've come to the conclusion after years of wiring that there's nothing delicate attached to pot backs or switches which can be fried by too much heat. Unless you can come up with an explanation how using a lot of heat will somehow damage parts which are solely metal but not the wire itself??

Tugging on a wire tells you nothing. And visually inspecting your work after you have soldered it is almost useless...you need to know what you're doing and watch the solder AS you are soldering.

Again, you are misconstruing what I was trying to say for the purpose of just appearing superior. Evaluating and tugging on a joint does indeed tell you something. It tells you if there is a good mechanical connection. Yeah, the only way to be positive if there is an electrical connection is by testing through the amp or with a meter. But you still have to develop an intuitive approach to evaluating your joints at some point. It is also possible to have a joint which will meter a sound electrical connection but will not have a sound mechanical connection and can come loose as soon as you've fiddled with the pickguard or other parts.
 
Last edited:
Re: First wiring attempt gone wrong. HELP!

Heat can indeed damage/burn the substrate the resistor track is on, creating breaks in the signal making the pot nonfunctional. Tugging on a soldered connection doesn’t reveal if the wire inside is making contact with the metal lug under the solder, IME.
 
Back
Top