Hello first post...I've search to try to figure this out...a wiring question regarding the newer CTS pushpull pb board pot for my partscaster one HB one vol one tone .Following the SD wiring guide I'm using the pushpull volume to split the pickup.Hot to left lug,red and white soldered together at C2 eyelet and 3 eyelet to ground along with the green and bare soldered to casing of pot.In following this wiring I get no splitting when pulling up, both coils are still active.... also I'd much prefer to have the north coil active in the bridge position.Thanks
You are using an out of date browser. It may not display this or other websites correctly.
You should upgrade or use an alternative browser.
You should upgrade or use an alternative browser.
Help with coil splitting SD JB Humbucker with CTS pushpull
- Thread starter Cragway
- Start date
beaubrummels
Well-known member
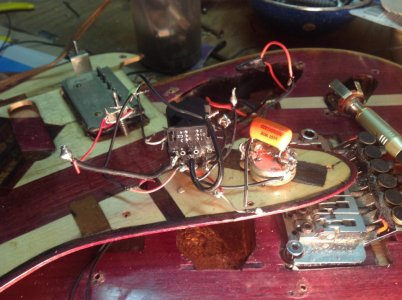
Sounds right. Would need to see a photo of the actual wiring to tell what else might be wrong. The description sounds like connection 3 is not reaching ground.

beaubrummels
Well-known member
Are the wires soldered into the CTS pot? Or just inserted into the holes? I see a lot of spliced wires, Hard to trace. My first thought is the wires aren't connected well into the CTS switch. My second thought is one of those many splices isn't good so the 3 position isn't reaching ground properly.
Are the wires soldered into the CTS pot? Or just inserted into the holes? I see a lot of spliced wires, Hard to trace. My first thought is the wires aren't connected well into the CTS switch. My second thought is one of those many splices isn't good so the 3 position isn't reaching ground properly.
Thanks,yeah the pu wires are short so I had to splice longer lengths to reach.Yes the wires are soldered into the pushpull...I checked over the best I could that the connections are adequate...I don't have a multimeter to check things properly.Those pu wires are fragile.I was thinking maybe unsolder the wires from the pushpull and use C1 and 2 positions.
I don't mean to be critical...just trying to help you solve your problem, but this is one of the worst soldering jobs I've seen. Nearly every one of the solder joints looks like a cold joint with way too much solder-globbing at each one. Your problem could be with any of those solder joints/connections or a short somewhere.
My recommendation would be to redo completely the wiring, with only one splice per wire (I see some wires with multiple splices), and see if it fixes the problem.
When you solder, make sure your iron is hot (usually that requires at least a 50 watt iron) and that you are using a large chisel tip (this holds more heat than a fine point tip). First heat the items to be soldered (back of pot, wire, lug, etc) THEN, with the iron still on the heated pot back and wire, touch the solder (60/40 rosin core solder...don't use lead-free solder, the melting point is much higher and very difficult to work with) to the heated metal and let the solder flow like water onto the parts being soldered. You only need very thin solder. You should NEVER need to have a large glob.
I disconnected everything and did a better solder job.I bought another pushpull figuring I fried the older one and wired it up exactly as is specified.Red & white to C1 1 to ground every other connection is correct.Am I missing something here?...pull up on switch and tap on screw and slug side and both are still active.Out of options
ThreeChordWonder
New member
A couple of observations:
1. You can always split open / cut back the black plastic sheath on the pickup lead to expose more of the inner wires if you need to.
2. Splicing wires is easiest done by twisting the wires together, soldering the twisted ends using just enough solder, then folding the ends over and putting heat shrink over the joint.
3. On those CTS push-pulls, I like to pre-tin the wire ends, then push them through from behind, then use just enough additional solder to fix them. This helps prevent too much solder creating "shorts" on the faceplate, keep things looking neat, and helps prevent charging or melting of the insulation.
4. The split humbucker wires go black (hot) to the lug on the pot part of the push-pull, not to the push-pull; red and white get joined together and both go to the same C1 or C2 on the push-pull; green and bare get grounded to the pot casing. You run another wire from the selected push-pull contact to ground on the same pot casing.
5. Even coil split, the "tap test" (tapping the poles with a screwdriver or something), often produces some sound that you think is coming from the deactivated pickup. You're giving the pole pieces a comparative mighty whack and thus still disturbing the overall magnetic field and inducing some current in the active pickup.
6. The maxim "the bigger the blob, the better the job" is a joke. Use just enough solder to get a joint.
7. Test each joint with a multimeter as you go.
Last edited:
A couple of observations:
1. You can always split open / cut back the black plastic sheath on the pickup lead to expose more of the inner wires if you need to.
2. Splicing wires is easiest done by twisting the wires together, soldering the twisted ends using just enough solder, then folding the ends over and putting heat shrink over the joint.
3. On those CTS push-pulls, I like to pre-tin the wire ends, then push them through from behind, then use just enough additional solder to fix them. This helps prevent too much solder creating "shorts" on the faceplate, keep things looking neat, and helps prevent charging or melting of the insulation.
4. The split humbucker wires go black (hot) to the lug on the pot part of the push-pull, not to the push-pull; red and white get joined together and both go to the same C1 or C2 on the push-pull; green and bare get grounded to the pot casing. You run another wire from the selected push-pull contact to ground on the same pot casing.
5. Even coil split, the "tap test" (tapping the poles with a screwdriver or something), often produces some sound that you think is coming from the deactivated pickup. You're giving the pole pieces a comparative mighty whack and thus still disturbing the overall magnetic field and inducing some current in the active pickup.
6. The maxim "the bigger the blob, the better the job" is a joke. Use just enough solder to get a joint.
7. Test each joint with a multimeter as you go.
Thanks,I have the connections as to what you outlined,pretty confident in the "connectivity" I'm just not sure if the pickup is actually split ...having never done it before, when I pull up on the switch shouldn't there be a slight noticeable volume drop ?...I don't hear any difference strumming a few chords.
Just wondering...racking my brain...switch the common ground green wire with the black hot wire
ThreeChordWonder
New member
Do the tap test.
Gently tap both coils with a screwdriver or something else metallic, preferably steel. Repeat with the coil split activated.
Gently tap both coils with a screwdriver or something else metallic, preferably steel. Repeat with the coil split activated.
Do the tap test.
Gently tap both coils with a screwdriver or something else metallic, preferably steel. Repeat with the coil split activated.
Thanks,tapping lightly with switch on and off I don't notice any difference...shouldn't there be an audible difference when switching?
ThreeChordWonder
New member
If both are working and at the same level split and not split you're not grounding the red and white pair when you split. Either that or you've created a short somewhere. Without seeing closeups we can't tell.
Oh. Did you put in pot to pot and pot to output jack grounds? Don't rely on foil on the back of the pickguard or anything else.
Oh. Did you put in pot to pot and pot to output jack grounds? Don't rely on foil on the back of the pickguard or anything else.
If both are working and at the same level split and not split you're not grounding the red and white pair when you split. Either that or you've created a short somewhere. Without seeing closeups we can't tell.
Oh. Did you put in pot to pot and pot to output jack grounds? Don't rely on foil on the back of the pickguard or anything else.
Ill try an post a few pictures...have all the ground wires together and soldered to pushpull vol casing -tone pot,pushpull 1 eyelet,output jack and Floyd Rose spring claw.

ThreeChordWonder
New member
Did you buy that thing used?
Reattaching coil wires can be done, but it's tricky. If you have to pay someone you're as well just buying a brand new pickup IMHO.
Reattaching coil wires can be done, but it's tricky. If you have to pay someone you're as well just buying a brand new pickup IMHO.
Artie
Peaveyologist
Reattaching coil wires can be done, but it's tricky. If you have to pay someone you're as well just buying a brand new pickup IMHO.
I gotta agree with TCH here. Someone has converted that to a 2-wire pup. Given your soldering skills, (and I'm NOT knocking them), I wouldn't attempt that. Get a new/used pup.
Also, I believe Duncan themselves will redo the original 4-conductor wire for $20 + shipping.
Jeez,everyone busting my chops on my soldering skills ...") there not that bad really.I took my time rectifying the compromised pickup,anyway I'm enjoying my new to me split 30 year old SD JB,although it won't replace a true single coil it gets you in the ballpark...I gave the pickup another 30 years of service.
there not that bad really.I took my time rectifying the compromised pickup,anyway I'm enjoying my new to me split 30 year old SD JB,although it won't replace a true single coil it gets you in the ballpark...I gave the pickup another 30 years of service.
Peace
there not that bad really.I took my time rectifying the compromised pickup,anyway I'm enjoying my new to me split 30 year old SD JB,although it won't replace a true single coil it gets you in the ballpark...I gave the pickup another 30 years of service.Peace
Similar threads
- Replies
- 1
- Views
- 151
- Replies
- 7
- Views
- 639
- Replies
- 10
- Views
- 722