No split coil diagram.

cooldonkey

New member
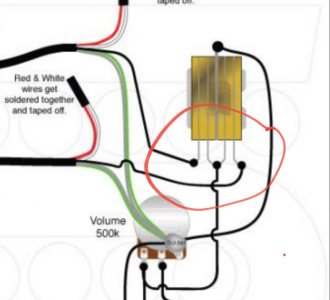
So hey guys, super noob question: I have a set of bucks that I've thrown/exchanged in a couple of guitars cause I really like they way sound. (Sentient & Pegasus)
I thought I had installed them without push pulls/splitting coils before. (I could be wrong it's been a while) I've installed them in a new guitar without push pulls, and I thought I had found the right diagram, but both the pickups are always on and making a lot of noise regardless where the 3 way selector is at. (2 Humbuckers, 1 Vol, 1 Tone, 3 way toggle. Not push pulls pots.) Could someone direct me to the correct diagram, or just tell me I'm all f'__ed up. lol.. Thanks!
 
Thanks Buddy.
Yeah, that's the one I used. Doesn't work correctly. 1) The selector ends up being backwards. (or did before I had to replace the stereo barrel jack for a mono one just to get output) 2) I can't tell if it's just a drawing mistake, or it's obscured, but the pickup ground (green) solder to the volume pot is also soldered to the 3rd tab on the volume pot?.. Something is off. I've gutted the electronics from the guitar I've put these pickups in. Everything is new. Ok man, Thanks Again for the effort.
 
The selector and pots in the schematic are all viewed as if you're looking at them from the bottom.
And the 3rd tab on the volume is bent and soldered to the base of the pot, along with the green and bare wires from the pickup, and the other grounds from the switch, bridge, and jack.
I've used this diagram for several guitars and its always worked as intended.
 
this pic shows what I'm saying about the 3rd lug. You can also just run a solid bar or wire from the lug to the back of the pot, as long as it's grounded.
grounding_braided_hook_wire_to_pot.jpg
 
The SD diagram kinda makes it look like the green, bare, and 3rd lug all have to come together at that point. They don't, they just all have to connect to ground/the back if the pot.
 
Yeah, I did the solder of the tab to the pot casing, and I'm glad I checked the forums and got ur answer, cause I was just about to de-solder that. Thanks. I gotta trouble shoot this again. It's just not making sense. Ok.., back too it. lol..
 
You can always post pics of what you have going on....maybe we can spot something.
 
If you're wiring your SD humbuckers the normal way then yes, green and bare get soldered to the volume pot. The green is the pickup ground. The bare is the baseplate / shield ground and ALWAYS goes to ground.

The black is the hot.

Red and white get soldered together. Insulate the ends with electrical tape, or better, heat shrink.

If you were mixing Fender and SD pickups you would reverse the black and green connections as SD pickups are reversed polarity compared to Fenders, and, I believe, diMarzio.

The third lug on the volume pot must be grounded too. Otherwise you'll get no output at all.
 
Last edited:
If you're wiring your SD humbuckers the normal way then yes, green and bare get soldered to the volume pot. The green is the pickup ground. The bare is the baseplate / shield ground and ALWAYS goes to ground.

The black is the hot.

Red and white get soldered together. Insulate the ends with electrical tape, or better, heat shrink.

If you were mixing Fender and SD pickups you would reverse the black and green connections as SD pickups are reversed polarity compared to Fenders, and, I believe, diMarzio.

The third lug on the volume pot must be grounded too. Otherwise you'll get no output at all.

Right. All that is done. My issue is that the toggle switch/selector (standard), doesn't switch between the pickups. Both humbuckers are on all the time regardless of what position the selector is on. (i.e. neck, neck-bridge, bridge.)
I'd post pics, but I get an upload error when uploading to the server directly, and I didn't really want to go looking for a host site to do so. Was hoping this would be resolved before that. lol..
 
Sounds like either something is shorted inside the switch or where the pickup leads connect to the switch. If something is bridging these 3 lugs or if they are bent/touching each other, that will cause both pickups to stay on all the time.
 

Attachments

  • Screenshot_20220202-080346_Chrome.jpg
    Screenshot_20220202-080346_Chrome.jpg
    43.8 KB · Views: 0
Could just be a worn out switch (the plastic thing in the middle) or the contacts needing adjusting.

Remember a switchcraft type toggle switch works by breaking contacts, not making them. The default is therefore both input contacts in, um, contact, with the common output contact.
 
PROBLEM SOLVED. Yeah "short." Solder at 3rd volume post insufficient. Had to cake it on. Thanks for all the help guys!

That's just asking for trouble.

It indicates that your soldering iron (or the back of the pot, or both) wasn't hot enough. A good solder joint will have very thin, like water, solder connecting the wires/lugs/pot. If your solder is "caked on" in order to make a contact, it is a "cold solder joint" which will eventually fail (even though it may seam to be working now).

You should heat the back of the pot until the solder will just flow on to it. Do not heat the solder and let it drip onto what you are soldering.

The key is..."meat follows heat". That means, heat whatever you want soldered and then touch the solder to the heated metal. The solder will flow toward whatever is hot (enough). A connection with just watery thin solder will conduct electricity better and will actually be stronger than if the solder is very thickly caked on.

Soldering is not hard, but it is a skill which can easily be learned once you know the proper way to do it.

I'm glad you got things working, but I'd reflow each joint and remove all the excess solder if I were you. I'm not trying to criticize you, just giving some friendly helpful advice.
 
PROBLEM SOLVED. Yeah "short." Solder at 3rd volume post insufficient. Had to cake it on. Thanks for all the help guys!

The solder shouldn't be providing the connection. You want to make sure the metal parts have good contact. The solder is only there to hold them in place long term.
 
The solder is there to form a metallic bond between the wire and the lug. The solder alloy will fuse to the surfaces of both without melting them.

Soldering and brazing are distinct from welding in that neither parent metal piece actually gets melted.
 
The solder is there to form a metallic bond between the wire and the lug. The solder alloy will fuse to the surfaces of both without melting them.

Soldering and brazing are distinct from welding in that neither parent metal piece actually gets melted.

Correct. Soldering and welding are two distinctly different animals.

I would add to your statement with...solder is there mainly to provide a good electrical connection and to insure that the items being soldered stay in contact with each other...a "bond" of sorts, but definitely not "fused together" as in welding.
 
^Agreed. Although, as ever, there are nuances.

Soldering can be a mechanical joint, for example copper pipe joints.

And brazing and silver soldering definitely fall into the mechanical joint territory, even though technically they're still soldering not welding. The Norton Wideline frame I've got for my Triton build, if I ever get to finish it, is brazed. Some say because the parent metal doesn't get hot enough, it doesn't get "heat treated" by brazing.

But electrical soldering really is primarily for electrical continuity with the added bonus of some mechanical strength.

FWIW the biggest welds I ever experienced were on some pipeline reel shafts we had to make in a hurry. Seven inch plate hot rolled into 39 inch diameter cans. Longitidudinal and circumferential sub-arc welds, 22 sq in cross section and up to 6 feet long.
 
Back
Top