You are using an out of date browser. It may not display this or other websites correctly.
You should upgrade or use an alternative browser.
You should upgrade or use an alternative browser.
Paisley top help needed
- Thread starter blakejcan
- Start date
blakejcan
Well-known member
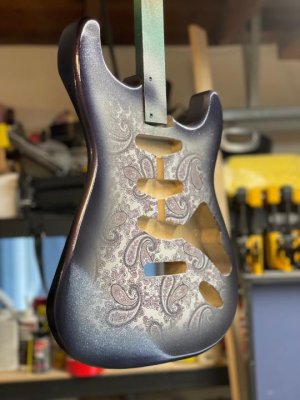
I'll take a pic later today but I think I got this to a decent place. I added a small bit of wood filler to all the edges and sanded it back down to help ease the transition and help eliminate any witness lines. I also went back and cutout the paper in the belly contour that was all jacked up and wrinkly and now it looks much cleaner.
The paper I used didn't cover the body entirely so I'll have to do a pretty wide band on the burst but I knew that going in so I'm good with that. Probably a big silver band with a smaller black band around the exterior.
The paper I used didn't cover the body entirely so I'll have to do a pretty wide band on the burst but I knew that going in so I'm good with that. Probably a big silver band with a smaller black band around the exterior.
blakejcan
Well-known member
I came back to this and put some nitro clear on it to try and lock it in. The front side that I used the Titebond on looked like a wrinkly turd once I put the clear on. I pushed ahead to see if I could layer it up. I knew some of the cruddier parts would be under the pickguard so I did a quick silverburst on it. Looked even worse.
The titebond was a bad choice but also the edges of the paper all had huge witness lines or they had fuzzy parts after sanding.
I have another piece of paisley. I'm going to sand off the top and put on a new top with the spray adhesive I had more success with on the back.
I'm not entirely sure how to eliminate the witness lines at the edges. I tried adding in some wood filler to sort of blend them in after sanding it back but that didn't seem to do a lot. I guess you could try and layer it up with nitro too but that would be a lot of nitro and a hot mess as it shrinks back over time. Very open to any amazing ideas on this one.
I can add a pic if anyone wants to see a mess. I wonder how Fender does this all the time? Hmm .
eclecticsynergy
Well-known member
Seems to me the thinnest possible adhesive layer would be best, like the spray.
If using Titebond, maybe thin it before applying.
If using Titebond, maybe thin it before applying.
blakejcan
Well-known member
After re-doing the top and putting a layer of clear and a silverburst back on it the whole thing looks much better but still has fuzzy edges in places.
On the back I did the same thing and then sanded down the fuzzy edges and resprayed and it looks good.
I think slapping some laquer on it kind of hardens up the paper enough so that you can sand it down and de-fuzz it a bit when you sand and then you are good to re-spray it.
On the back I did the same thing and then sanded down the fuzzy edges and resprayed and it looks good.
I think slapping some laquer on it kind of hardens up the paper enough so that you can sand it down and de-fuzz it a bit when you sand and then you are good to re-spray it.
larryguitar
Active member
After re-doing the top and putting a layer of clear and a silverburst back on it the whole thing looks much better but still has fuzzy edges in places.
On the back I did the same thing and then sanded down the fuzzy edges and resprayed and it looks good.
I think slapping some laquer on it kind of hardens up the paper enough so that you can sand it down and de-fuzz it a bit when you sand and then you are good to re-spray it.
I wonder if a clear fiberglass resin would work for the edges? A thin layer to harden the fabric and fill the transition down to the body surface?
Just spit-balling here.
Larry
larryguitar
Active member
I think a good amount of guys out there using thicker urethane finishes to solve for the edges
Yeah, when I sprayed poly you could bury a mosquito with one coat, and a bumblebee with three.
Larry
blakejcan
Well-known member
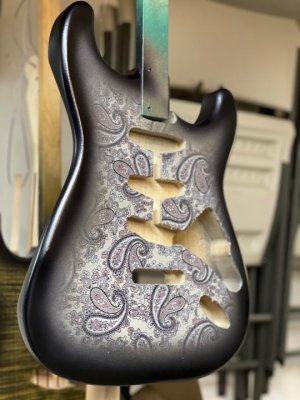
After spraying more on there I went back to the witness lines at the edges and sanded them back. It was flush feeling to the touch but you could still see some lines at the right angle. I went back in yesterday and added a very light, transparent blackburst hoping that would be the last bit I'd need to bury the lines but eh.....you can still see them at different angles.
It's subtle and overall, the guitar looks freaking great but it's definitely not perfect. I'm going to relic this anyways so I'll find a way to get rid of those lines that way.
If I were to do this again I'd find a bigger sheet than what Rothko & Frost sells that goes all the way to the edges but I'm still very happy with it. Now to bury everything in clear.

Chistopher
malapterurus electricus tonewood instigator
He'll yeah
blakejcan
Well-known member
Little update here. I was still able to see a little bit of a line at certain angles so I went back, sanded it down and then added a few layers of black to the burst and edges in hopes of fully burying the lines. For the most part, I got there but you can see it in parts. I think the darker burst makes it pop a bit more too which is good.


blakejcan
Well-known member
I am typically not a paisley guy but I like that a lot. Can you route the bridge for a humbucker and ship it out to me?
If you actually want to buy it, yea sure. Removing wood is easy.
Securb
One of Jerry's Kids
If you actually want to buy it, yea sure. Removing wood is easy.
I would love to but I have some gear purchases coming up
Similar threads
- Replies
- 2
- Views
- 235
