Re: Removing pot knobs - Any tricks?
Hey, Stratomaniac, I really like that axe in your avatar! That's some serious wood.
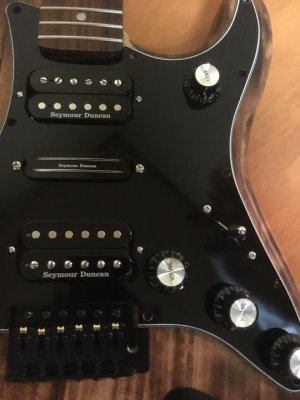
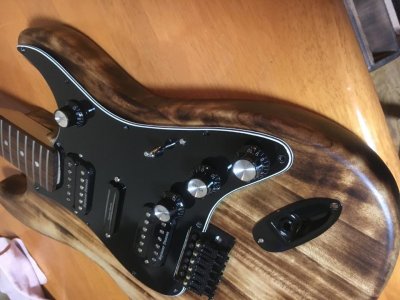
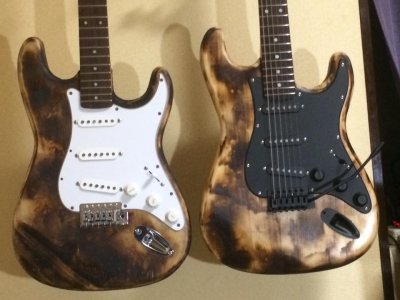
Hey NotCardio! I'm happy to hear you like it, but it's actually some seriously cheap wood! It's just a cheap basswood body from an el'cheapo guitar I bought for 20 bucks at the recycle shop. I've built a few in that style over the last few years. I guess I was honing my technique to build myself the triple SD bucker monster. I sold the others off cheaply with all cheap crap electrics, but they were well set up played sweetly. The monster strat is 3 x push/pull split coil volume and one master tone. It's still a work in progress, but it's getting close to annoying the hell out of my neighbors! I'm an old schooler who likes ACDC, Sabbath, Led Zep and all that other 'awesome' old school stuff, most of which is played on Les Pauls, but I love strats, so I built one that will do it all!
However, the dark side is, you have to be a bit lucky getting a nice body coz nobody knows what's under the paintwork. I got one for a project and after removing the paint I found that half of the top of the body was just filler. Glad it was only 20 bucks. It kept me warm for ten minutes in a beach bonfire. After going through most of the the cheap brands I found the Selder guitars to be quite reliable for a good body and the necks are pretty good too, if you can find one with nicely finished fret edges. Some of them are like daggers! Photogenic is a popular cheap brand, but they are just garbage under the paint. I stripped one that was actually plywood under the paint. I poop you not! Stripping the paint off them is not such a toil if you have the gear. I thought I'd share the technique with you and anybody else that would like to try. It's essential to have a couple of hundred bucks worth of power tools though. Without them you'll give up after an hour.
Tools:
Heat gun (paint remover) and a scraper
A good quality spraypainter's mask coz the fumes from burning Nitrocellulose paint will kill you!
Belt sander
Orbital sander
A small circular sanding bit that goes onto a power drill to get into the neck cavities
A trimming router is essential if you have to deepen, widen or create body cavities for pick ups, extra switches/pots, etc. - I have used a chisel, but it's a bit of a 'rough as guts' technique.
A blow torch burner - I use one made for starting charcoal BBQs. It works a treat!
A pressure pack of acrylic lacquer satin clear
A few sheets of #120 sandpaper.
A couple of bench clamps (and a bench)
You'll also need TIME and BEER! Lots of both!
Technique:
1. Get the paint off! Strip the body to bare bones. I set it upon a BBQ plate to avoid anything else catching fire. Get the heat gun into it and start scraping. You can remove around 80-90% of the paint with the heat gun
2. Get the little sanding bit on your drill and remove the paint from the cavities at the front of the body.
3. Clamp the body to the bench and get into it with the belt saner to get the front and back paint free.
4. The sides! You can burn a lot of the paint off the sides, but I've found it's much quicker just to set the belt sander up-side-down on the bench and sand it off.
5. The orbital sander. Put some #80 paper on the sander and get into it. This will remove any major 'accidents' from using the belt sander.
6. Change to #120 on the orbital and smooth it off. You'll have to hand sand in the neck cavities. Be sure to remove any filler you can see because it's bright white and looks terrible. Wipe it over with a damp rag and you'll see the filler easily.
7. Give the whole thing a hand sand to make sure all the edges are nicely rounded and look like a guitar body.
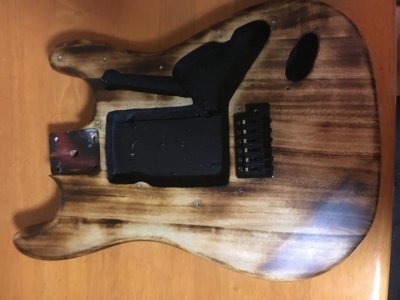
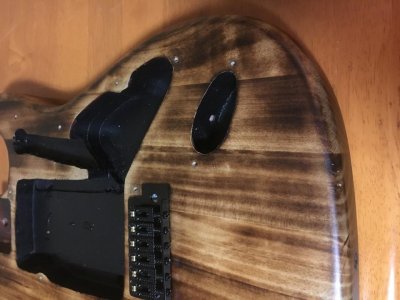
8. Now, you are ready to burn baby, burn! Get your blow torch going and burn the wood. Try to use long slow strokes over the whole body to get an even effect. A guide for speed is, when you see a flame in the wood, move on. It doesn't matter if it goes really black. Just be careful not to burn too deeply into the wood and create charcoal.
9. Put some #80 onto the orbital and start sanding. The more you sand, the better it looks. Just don't sand the burn right out. Sand it until you can see a nice stained wood grain with good contrast from the background.
10. Put some #120 on the orbital and smooth it off. Give the edges and cavities a hand sand with some #120 also. Get the edges nice and smooth and rounded. Wipe it down with a damp rag to remove all the charcoal dust and you are ready to paint - if you are happy with it. If not, just burn it again or sand it some more, or both. Again, make sure you have removed all the filler because it stands out like dog's balls and spoils the effect.
Painting: - Is easy!
Hang it up. I cut a piece of wood and just screwed it to the neck cavity it and hung it on my balcony with a bit of coat hanger wire.
Give it a wipe down with a clean clothe and then again with the palm of your hand (clean hands) to make sure you've removed as much dust as possible.
Hold the can 25-30cm (nearly a foot in old speak) away from the neck and spray it slowly in strokes, side to side. Make sure the spray is pointed away from the body when you press the button. DON'T point the spray at the body when you press it or you will get a run. (30 years of being a spraypainter/signwriter makes it easy for me). Quickly spray the edges and neck cavity too. Don't hold it too close or move too slowly. 5 or six light coats is better than one run in your paintwork. This is the point of using satin finish. You don't have to worry about a glossy finish. All you need to do is seal the wood, plus I think it looks awesome! After the sand with worn out paper, give it another two or three coats and let it dry for two days.
DONE!
Give it a go!
