Series wiring with mustang stlye switches.

AXington

New member
Hello, long time reader first time poster (lol).

So, I've got kind of a weird humbucker from Adeson that he no longer makes called the lucifer. Anyways, I had it in a guitar for a while, but never quite like how that guitar turned out so I've been doing some work with it, and am changing up my wiring. It's gonna be HSS with trisonics in the neck and mid position. Since they're Trisonics and that signature trisonic sound comes from the guitar being in series, I've got a couple issues/questions/etc with the wiring of it.

I bought 3 Mustang style on/on/on switches and a single on/on slide switch from stewmac, seen here: http://www.stewmac.com/Pickups_and_...arts/Switches/Switchcraft_Slide_Switches.html

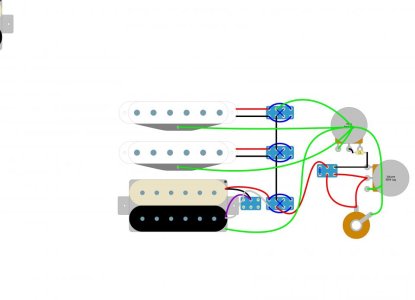
For the single coils I want on/off/phase with the mustang switches. So I've got this diagram:
mustant-phase.JPG
The question I have about it is that in the off position, it seems like this would completely kill the pickup, which in series would be a problem as it would kill the whole guitar. Am I wrong in thinking this?

For the humbucker I've been thinking about a couple possible configurations, and the one I think I'm most keen on is a humbucking/off/tap switch going into a phase switch for the humbucker. I've found a few diagrams but I'm a bit confused as to how these actually work or if it does. In the tapped position, am I correct in thinking that in the below diagram the south coil is the active coil? for some reason it seems like there's a jumper missing somewhere...
mustang-single-coil-and-humbucker-with-coil-tap.png
 
Last edited:
Re: Series wiring with mustang stlye switches.

Is Jaguar switch a straight replacement? That would make things much easier, not just installing, but for playing too.
 
Re: Series wiring with mustang stlye switches.

Jaguar switch is two position on/on. That's the on/on slide switch I mentioned for the phase switch for the humbucker. Mustang switches are weird. They're four column, two row switches, with 3 positions, and depending on who you ask are either on/on/on or on/off/on but either way the top position connects the top two rows on either side, middle connects to middle two rows on either side, and the down position, connects the lower two rows.

I am making a custom control plate, but there's only enough room for one switch per pickup then two more switches, and two pots. The output jack is going on the side of the guitar.

The guitar, just for reference is a guitar I built and designed myself several years ago, before I was even moderately skilled in woodworking, so I'm limited in some ways by what I did in the past, and free in other ways because I have no qualms about modifying it, even from a body perspective. It never turned out the way I want, and now I'm trying to get it to do so.


Here's an album of the work I'm doing. Nightshade Overhaul
It's a pretty massive overhaul. Some of the issues I'm having are due to, when I first built this, I had no idea what I was doing with a router, and had borrowed a very crappy one. I had a pickguard made by Pickguardian, with the assumption that filling the old cavity and re-routing would be either next to impossible or a bad idea. Now I'm questioning that assumption since I found a place that sells purpleheart veneer and realizing that neither vibratos I have that I had planned to use, will easily fit with the control plate I'm having made.

A summary of the work and plans are:

1). Lighten the body and increase contours. The original work was so heavy it caused me back problems. It was like having a double neck bass on my back. Plus the body was so huge it was just not the best and it lacked contour to make it look interesting.
2). Redo the headstock. Originally I had planned a 6 on a side headstock, but I was using a neck-thru neck from Carvin and I didn't think that headstock would easily accommodate a 6 on a side design. It came out crooked and I didn't drill the tuner holes evenly. I'm pretty happy with the newer results.
3). Add a third pickup. This was originally designed as a sort of more modern voiced "red special" with my own designs as part of it. I never got the sounds I was looking for with a single trisonic and humbucker from Adeson. The original switching didn't work exactly how I wanted either, and I didn't know how to route closer to the fretboard because the base of the router I was using was so large, and it never occurred to me to place wood blocks to rise it on either side, and I was unfamiliar with bearings on bits, so I freehanded the pickup routes, then sort of cleaned them up with a dremel. At one point the router bit slipped because the collet on the borrowed router was crap and no matter how much you tightened it, it didn't hold. It's a miracle it didn't go all the way through the body.
4). Add a vibrato, angle the body. Never could get a decent action, because I didn't understand body angles at the time and a TOM bridge is just too tall with no angle. Also, I want a vibrato. I'm obsessed with Brian May type sounds, can't do that without a vibrato/trem. I have a mastery bridge, and I have a Jag/Jazz vibrato and a bigsby style vibrato from GFS. I haven't decided which I'm going to use, however because of the original control cavity, and the required width because of the switches, I don't think either are actually going to fit, so now I'm considering going to a Jag or Mustang style control plate and filling the old route and putting a veneer over the entire treble side wing. It will require getting a new pickguard cut, more than likely, or modifying the one from pickguardian, which I'm hesitant to do. Also, I'm not sure where I'd get a blank Jag or Mustang control plate. There's not enough room now to do the switches on the pickguard. Plus I get a bit heavy handed sometimes and I have a tendency to hit switches on accident on Jaguars. Since the middle block is not straight on these necks, I'm also considering angling the control plate to match it, instead of going straight down. This MIGHT give me room to put the bigsby style on it. I doubt the Jag/Jazz will fit either way since it's a bit larger than the other.
5. Refinish. Debating going to a burst on this. Not sure how it'd look, but it'd cover a few mistakes I made back in the day.
 
Re: Series wiring with mustang stlye switches.

AHA! I found this, which I am pretty sure will give me what I need.
8ea264ba77db06eb471f570de5c9c7ba.jpg


So changed slightly how I was planning, but I can have the on/off/phase, then use the DPDT Jazz switch to tap the humbucker coil.
 
Last edited:
Re: Series wiring with mustang stlye switches.

So I made up this diagram, I think this will give me all the functionality I need. There's also a blower mini-toggle in there. Missing from this is the fact that I'm petty sure I'm gonna do a treble bleed mod. But that's just a resistor and capacitor in parallel across two of the volume pins.

Switches for the humbucker should be Humbucking/Tap (north coil R/B active), into on/off/phase.
HPcIMjkwiN18MLlr2
 

Attachments

  • Nightshade wiring v1.jpg
    Nightshade wiring v1.jpg
    40.1 KB · Views: 0
Last edited:
Back
Top