V Refinish Remod

Jocelyn

New member
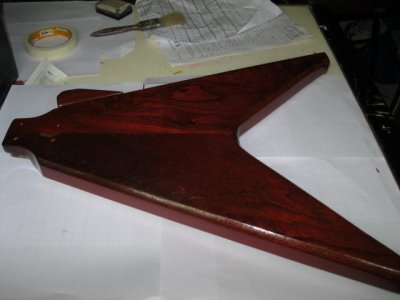
This has been on hold for a while. But I have finally started it. First a brief History This was my first electric. It started of with two very low out put single coils. Yes single coils on a V. I should still have a pic of how it looked originally somewhere and I will try posting that later. Well the first thing several years ago that I changed was the bridge. Got a better solid brass bridge for it. The next few years laterthe bridge pickup was replaced with a JB. The JB really made this guitar sound so much better. The next thing I got a single coil for the neck that some one had pulled out of their axe. It worked well . Finally I got a nice Ibanez SA120 and put the JB in it with a JAZZ neck. I put the pickups from the Ibanez in this V. But the guitar badly needed a refinish. Also over the initial years when I had it I had tried relocating the Strap studs to get a better balance and in the process had drilled a few holes in the body. One of the things that also happened was the two piece body started splitting at the joint . I guess bad joint and 3 holes that i drilled on the weak joint amplified the weakness.
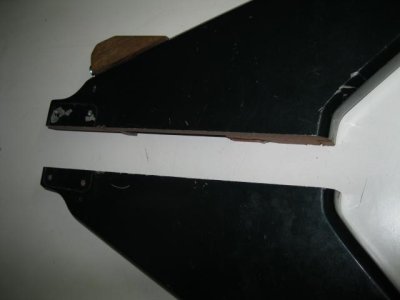
 
Re: V Refinish Remod

So here it is how it looked with the 2 Ibanez pickups.Before the refinish job.You can also see the joint crack I was talking about.
 

Attachments

  • IMG_0699.jpg
    IMG_0699.jpg
    17.4 KB · Views: 0
Re: V Refinish Remod

After giving it a lot of thought . I disassembled it on Wednesday 0.80.812. Right form the start I decided to go slow with this. I wanted to start this thread right then. But I was waiting to see how the joint would glue. I did not have any acces to any clamps and since this guitar is really inexpensive and this is just a fun project, and my first I did not want to invest in a lot of equipment. I got a few tips from "Melvyn Hiscock make your own Electric guitar", Dan Erlwines Guitar player repair guide". And from the many threads in this forum :) .And got it glued together. I kept a plank under the body and rubed some wax on the plank under the joint. The wax kept the body from getting glued to the plank. I also kept a sheet of newspaper folded under the joint. I used a few nails to hold the joint in place. Honestly I was just keeping my fingers crossed and hoping it worked. I gave it more than the usual 24 hours to cure . Glued it on Saturday afternoon, and on Sunday decided to let it cure for a day more. I began the paint stripping only today morning
 
Re: V Refinish Remod

I used paint stripper. I did one side at a time. Used almost 4 coats I think. Paint Stripper is quite Nasty. Use it always in a well ventilated place. and use at least some kind of mask.
 
Last edited:
Re: V Refinish Remod

Whoa! That thing's wild looking! I love weirdo hardware-what's that bridge??

Good luck on the repair and refin. Everyman projects are cool.
 
Re: V Refinish Remod

Thanks :) The bridge I got form a Guitar shop several years back. I was told it is brass but I doubt it, because when i took one of the saddles near the pickup poles it was magnetic.
 
Re: V Refinish Remod

Here are some more pics. I think I will stop here for today and let any striiper dry off before I sand. How do I get all that paint off the routing? I had thought of using the stripper before joining the two pieces together. But thought it would go in vain if the bodys did not glue well. It would have been easier to remove the paint from the routing. At first the glue line did not look good. But now after stripping the paint it looks much better. I am finding it hard to find wood filler. So I think I will have to go for a solid finish. I dont know if I can use auto body filler to fill in the screw holes, and then sand it.
 
Re: V Refinish Remod

Thanks Dominus. Gave it a 120 grit sanding. I am not really sure what colour to give it as of now.
 
Re: V Refinish Remod

I am not sure what finish . Yesterday I Stained the wood, as I thought a nice clear red Finish would be nice. But now wondering if I should do a block finish. Will most more pics later. I filled the wood with wood filler. Just letting it dry.
 
Re: V Refinish Remod

Ok here is the update. I decided to go for a clear finish. I made a few mistakes while wood filling and when applying the first coat and had to sand it back to bare wood twice. So much for being a newbie to this. I used a yellow strainer and then a red strainer. The neck about which I was worrying about is actually looking better. I am doing one side at a time will post pics of the front maybe tomorrow or so . This is just 2 thin coats. I have done about 5 coats on the neck. I think I can go more slow as I am still waiting for the Dimarzio pots, and switches.
 
Last edited:
Re: V Refinish Remod

The last 2 pics look much more darker then they actually are.
 

Attachments

  • IMG_0785.jpg
    IMG_0785.jpg
    27.2 KB · Views: 0
Re: V Refinish Remod

hell yeah. that dark maroon colour looks GREAT. sorta like the Gibson special faded series.
 
That's a hell of a restoration. Especially after the body came apart like that. Nice work getting it this far.
 
Re: V Refinish Remod

Thanks guys. I am still skeptical about it though.Taking one step at a time. Just got all the info I got so far from forum tips and books. I am enjoying it though. The difficult part was gluing the body together as I had no access to any clamps. And did not want to invest in any clamps for a one of job, that too for a axe that has hardly any resale value.
 
Last edited:
Re: V Refinish Remod

Its shaping up well. I like that neck profile ..nice and fat rounded C shape! That right there is worth fixing the guitar for.
How are the frets. Can you have anyone machine you a strightedge ..then just glue 400 grit sandpaper on to level them?
 
Re: V Refinish Remod

Thanks Jerry .The frets are good no problems with them. The neck is actually quite thin but broad. I think the photos give a diff impression.
 
Re: V Refinish Remod

That's a hell of a restoration. Especially after the body came apart like that. Nice work getting it this far.

Agreed!!!

Thanks guys. I am still skeptical about it though.Taking one step at a time. Just got all the info I got so far from forum tips and books. I am enjoying it though. The difficult part was gluing the body together as I had no access to any clamps. And did not want to invest in any clamps for a one of job, that too for a axe that has hardly any resale value.

Well, skeptical is prolly normal. The best parts are that you are enjoying it, and you are gaining great experience!
 
Back
Top