You are using an out of date browser. It may not display this or other websites correctly.
You should upgrade or use an alternative browser.
You should upgrade or use an alternative browser.
A bad decision has been made
- Thread starter blakejcan
- Start date
blakejcan
Well-known member
Took it to a local builder for another opinion and he was a bit terrified of it. He agreed that most likely the backstrap (no splines) and sandwiching the remaining bits of the headstock is likely the best bet. I got some new maple coming in tomorrow so I'll get it all ready this weekend.
I think I'm going to try some rock hard epoxy to glue it all together. Chris or others--any recommendations on what to use?
I think I'm going to try some rock hard epoxy to glue it all together. Chris or others--any recommendations on what to use?
ICTGoober
Well-known member
Several reasons - first of all, it's a difficult repair if you mess it up. The epoxy will contaminate your substrates, and it's difficult to get both surfaces clean enough to hold again. It's worse if you don't get the mix right. It might not ever cure, or just take a long time. Epoxy has it's place - but very seldom is it appropriate for instrument work. The whole point is that it's repairable - not permanent.
What makes you think epoxy is stronger? It's strictly a physical bond, while Titebond (or any other yellow aliphatic resin) bonds physically and chemically. Since Titebond is water based, it's absorbed into the wood grain. Epoxy does not. There have been many instances shown where a glue joint with Titebond is stronger than wood by itself.
What makes you think epoxy is stronger? It's strictly a physical bond, while Titebond (or any other yellow aliphatic resin) bonds physically and chemically. Since Titebond is water based, it's absorbed into the wood grain. Epoxy does not. There have been many instances shown where a glue joint with Titebond is stronger than wood by itself.
This is gonna sound really weird, but....
I TOTALLY agree with Chris (this time).
There is absolutely nothing to be gained from using epoxy. The strength comes from the wood, not the glue. The glue just acts to hold the two pieces of wood together and you're not going to get a better bond than with Titebond (I prefer Titebond 3) to new clean maple. There is a very real possibility that you don't get a perfect mixture ratio with the epoxy and it doesn't cure totally hard and stays somewhat flexible. Definitely NOT what you want with this repair.
Epoxy has its place...mainly with oily type woods which may not bond well with a water-based glue like Titebond. But that's not the case with the type woods in your repair. I've never had a bond fail using Titebond (even on some slightly oily woods). And as Chris eluded to, there have been MANY studies that show the bond is much stronger than the wood and any "failure" that does occur is in the wood not the glue. I've tried breaking apart glue joints that I have made and EVERY time the wood itself tore apart, NOT the Titebond.
I wouldn't worry about the repairability of your repair with Titebond vs epoxy. Just do it right and you'll never have to repair it again.
this thread is bringing unity to the board?
I'll take what I can get. If it takes rebuilding necks and keeping spam off the board, I'm all for it.
blakejcan
Well-known member
Bit of a progress update.
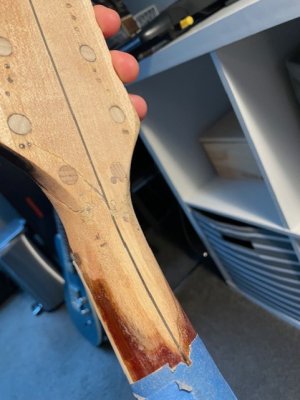
The headstock had been previously sanded and had rounded over edges. I level sanded the front and back of the headstock and I am now working my way slowly down into the neck as well to make some room for the backstrap.
I also put together a piece piece of maple with a very thin walnut strip down the middle that will hopefully line-up with the existing walnut strip going down the back of the headstock and through the entire neck.
Once I am done with prepping the neck I will have to match the backstrap piece with the same contours and then glue it up. I am feeling oddly confident about this part so fingers crossed.
The part I am having trouble wrapping my head around a bit is that the headstock is crooked when looking down the top of the headstock towards the body. I plan to add more wood than I will need and then try to level it back as best I can. The leveling part is where I get stuck in my head. To level something you usually need at least one flat surface to reference off of. In this case, with the headstock slightly twisted, there is no flat side to reference.
Best I can come up with is to try and reference off of the neck somehow, eyeballing it and good thoughts. Open to suggestions for sure. Getting there!
blakejcan
Well-known member
Good idea visually for sure. I was just hoping to have at least one flat surface that I could then use with a mini-planer or something else as reference. All good though. We'll see how my carving hand does.
One more question and then I think I'm ready to keep pressing on. I am going to be doing my best to follow this video:
https://www.youtube.com/watch?v=P7tDNAIEX80
I'm trying to re-watch this a million times and zoom in to get an idea of just how much wood I should be taking off in order to make room for the backstrap so that it can add enough strength.
On the backside of the truss rod cavity it's really not hanging on by much. I'm thinking I'd want to shave it down a fair amount so I can add in as much of the good backstrap wood as possible. But then would that take away from the bits that are holding it together? Not sure which way to go there.
Here is how far I am in shaving it back right now.

blakejcan
Well-known member
while I'm at it.........I have another question about the finish. The neck for sure has been repaired previously (duh) and refinished. Instead of being super translucent it is definitely a bit more opaque. I'm guessing that was intentional to try and hide the bondo, nails and staples from the previous repair. I am guessing that the body has also had perhaps another layer of clear of some sort applied as well?
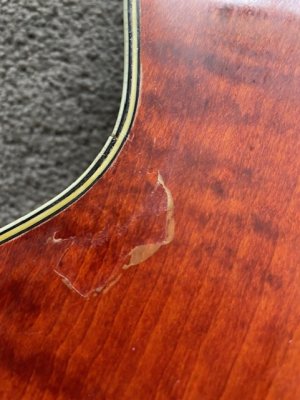
When held up to the light you can see multiple drips and orange peel. It's also flaking off in a couple spots and under that top layer it appears to be smoother and a bit more translucent. Also all of the binding has a very distinct yellow layer of whatever clear is on there. It will also flake off in parts and then reveal a white and clearly still coated layer underneath.
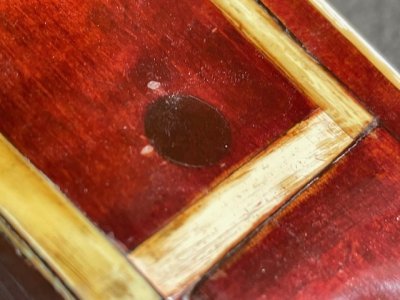
Lastly, up by the neck there is some definite color that got on to the binding. I'm guessing they didn't tape off the body when refinishing the neck? Tough to say.
Anywho......I doubt I could effectively flake off all of the weird mystery clear on here. Could I maybe slowly wetsand it back? Or should I? I'll be refinishing the neck anyways and I'd love to get the body to a place where you can see all of the great maple flame/quilt in there too.
In the pics below you can see the flaking in one and in the other you can see the weirdness where the color and/or yellowed clear got into the binding as well as those two white spots which are drips that sanded back a tiny bit.


ICTGoober
Well-known member
Have you taken it outside and wiped it down with a rag full of lacquer thinner?
BTW the video is good reference material. Good bunch of guys on the Looth Group. I wouldn't use sandpaper so much, I'd use cabinet scrapers. Either a big rectangle, or the little egg shaped middle sized one StewMac sells. It's a go-to for me, very handy.
StewMac Ultimate Scraper - StewMac
BTW the video is good reference material. Good bunch of guys on the Looth Group. I wouldn't use sandpaper so much, I'd use cabinet scrapers. Either a big rectangle, or the little egg shaped middle sized one StewMac sells. It's a go-to for me, very handy.
StewMac Ultimate Scraper - StewMac
Last edited:
Similar threads
- Replies
- 18
- Views
- 3K
