how do you make the heel of a Les Paul Jr neck?

blakejcan

Well-known member
Making my first set neck using this template set:

https://reverb.com/item/29764961-gi...4-55-56-57-jr-1-2-mdf-guitar-router-templates

Body looks perfect.

Neck is coming along great. Headstock, truss rod, rough cut body shape all done. About to add the fretboard.

I just can't quite figure out two things:

1. how long should the total neck dimension be?
2. how are you supposed to shape the heel?


The template has some dimensions for shaping the body but nothing for the neck.

I guess I could use the neck pocket template from the body as a guide for shaping the neck. And I plan to build the proper neck angle into the heel of the neck itself, not the neck pocket.

But how long should it be from behind the fingerboard to the heel? Some online pics show it pretty long? Others show it as like tiny stump?
 
Hey. I don't follow the first question because wouldn't you just measure the neck template from end to end to find that number?

Are you thinking its a long tenon like a regular LP?

It looks like they copied an example which had a squared off neck glued into a pocket with rounded corners. These show a gap between end of neck and end of pocket when you take the pickguard off. The black pickguard and sunburst were ways to hide that. This was a budget model originally... its not a long tenon like other models that extends under the neck pickup.

The back side of the heel beyond the body tapers from the neck carve to an arc just like a regular Les Paul

Either way the temaplte seller looks a lot more thorough than some others so the should be able to help. Happy building!
 
Thanks for the help.

Yea, I think you kinda nailed it. I was expecting to get a template with a rounded heel to match the neck pocket. Same way you get a rounded neck heel in a Fender neck template.

I was not aware that they'd just shove a squared off heel into a rounded neck pocket.

So when I was following the neck template that shows the profile it wasn't making sense to me as to where it would end.

I'm back now! :)

Thanks all!
 
Glad to hear it. I haven't seen too many building threads here but I'm always up for them. I'm going to build a proper Tele-Gib with Antiquity Jazz and JB any day now, I mean it!
 
I don't understand the problem. You make the neck fit the neck pocket, and then you shape the neck and carve down from the neck shaft profile towards the heel and you can do it any way you like.
 
I don't understand the problem. You make the neck fit the neck pocket, and then you shape the neck and carve down from the neck shaft profile towards the heel and you can do it any way you like.

I wanted it to be a no-brainer on the total length of the neck by using a template. I could just measure the right scale length and solve it that way. DUh.
 
I wouldn't feel bad...I worked for a place that sort of made stuff like this...My observations / rant...

Cheaper smaller CNC machines with digital probes and laser cutters has created an abundance of MDF templates for sale by people that often never built a single guitar. These sellers don't (or can't) tell you how to build a guitar with their templates. They only tell you the measurements of the final product. Its more like buying blueprints than buying a kit with step by step instructions. Not even crucial fitment issues are explained, like the oddity that the squared off neck heel on this one doesn't fit flush into the round cornered neck pocket, which anyone is going to be puzzled by. Let alone no explanation of what size router bits to use for each rout, how to secure and align the templates.

Now these look better than a lot - they gave thought to the need to have the template wider at the neck pocket to support it...But..The pickguard and especially the control cover would be almost impossible to make safely if at all with a handheld router. These need to be done on a router table.​
 
ha yea. I'm using a router table for everything. Even then the tiny stuff like the control plate is terrifyingly close to my fingers

Thanks for teh help all. I think I'm good now.
 
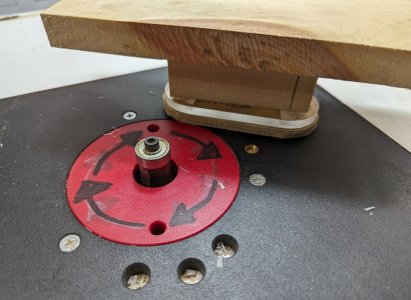
Excellent...I make these "handles" and attach with double sided tape to hold small parts from above at a distance. Similar to push blocks for a jointer. Takes a little getting used to. Look forward to seeing how the Jr turns out!

EDIT - it occurs to me I should explain for any human or robot who sees this pic...the arrows are the FEED direction of the workpiece which is the opposite of the direction the bit is spinning - AKA conventional cutting.

.handle.jpg - Click image for larger version  Name:	handle.jpg Views:	2 Size:	210.4 KB ID:	6318954
 
Last edited:
I like the jig there. I worked in plastic fabrication for years and used a table router all the time. It's always worth the time to put together an accurate, robust template that can be safely held.
 
Excellent...I make these "handles" and attach with double sided tape to hold small parts from above at a distance. Similar to push blocks for a jointer. Takes a little getting used to. Look forward to seeing how the Jr turns out!

EDIT - it occurs to me I should explain for any human or robot who sees this pic...the arrows are the FEED direction of the workpiece which is the opposite of the direction the bit is spinning - AKA conventional cutting.

.filedata/fetch?id=6318954&d=1754586014

That's an excellent tool. My issue though, is that I never get it to mill cleanly. I always have tearout, even with a fresh, new bit. I just can't get this part right. Very annoying, I have to admit.
 
You know more than me for sure but the closer I cut and then sand to the actual shape the more I can get away with no tear-out. Wood type seems to play a big part in the tear-out formula as well.
 
You know more than me for sure but the closer I cut and then sand to the actual shape the more I can get away with no tear-out. Wood type seems to play a big part in the tear-out formula as well.

I know, I tried. maybe I never found the right bit to do it with, dunno. I use a disc sander, one of those stationary devices with the disc vertically, to sand my backplates, but perhaps making new templates and a proper jig is the way forward. perhaps I just gotta try it again.
 
I agree the way to go is bandsaw or if necessary sand as close as possible first. I aim for getting to within about 1/16" (1.5mm) of the final shape before the router table. Close as possible on sharp edges or corners. Takes much time and patience to cut slow,

But same as blakejcan​ said, even with the best prep, technique, and bits, Flame Maple edges or Spruce end grain still get ripped up by the router table. I've seen spindle CNC's used to do multiple approach passes then a final finishing pass in different directions to minimize this. ...and I've seen demos of someone doing this "shaving" approach manually on a router table which is just bonkers to me its so unsafe.

Wood Magazine has articles explaining the pros and cons of when you can and can't do conventional vs. climb cutting to get cleaner cuts without a CNC.. Their examples are all large pieces though.
https://www.woodmagazine.com/tool-reviews/routers/climb-cutting-explained
https://www.woodmagazine.com/woodworking-tips/techniques/routing/climb-cutting
 
Last edited:
Back
Top