I started this thread a while back, exploring the same issue. Glad to know someone has published a diagram now.
https://forum.seymourduncan.com/foru...onnect-content
Here is the procedure I figured out at the time, copied and pasted here:
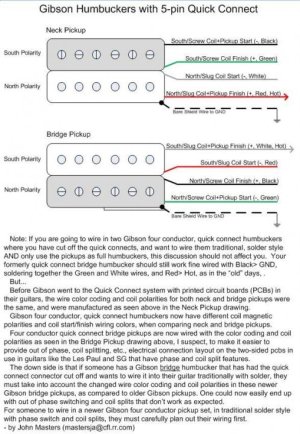
Note:
Ignore the Gibson colors throughout this procedure. All you need to do is pay attention to which side of the connector the bare wire is on.
Snip the Gibson quick connects with about two inches of lead on them.
Slip about a 1/2" to 3/4" piece of heat shrink tubing over each wire on the Gibson connector, and slide them down to the connector for now.
Slip a wider piece of heat shrink tubing, about 4-5" long, over the Duncan wiring bundle and slide it down to the end for now (by the pickup). Before shrinking, this wider heat shrink tube should be wide enough to accommodate the five tubing wrapped leads.
Open up an inch or two of the Duncan wiring bundle, and separate the bare lead, so you have five separate wires.
Make sure you have stripped enough insulation off of both the Gibson wires and the Duncan wires to let you splice them.
Orient one of the Gibson connectors with the bare lead to the left, and solder the Duncan wires to the Gibson wires in the following order, left to right (Duncan colors named – ignore the Gibson colors): bare, green, black, red, white.
Move the five pieces of heat shrink up over the solder joints and shrink them.
Move the bigger piece of heat shrink over all five smaller pieces, and down far enough to cover the Gibson colors (i.e. all the way to the connector). You want to cover the Gibson colors to avoid possible confusion in the future. Then shrink it.
Now the whole thing is connected properly and wrapped in black, so you never have to even see or think about the colors again.
Do the same with the other pickup and connector.
If you ever want to put the Duncans in a different guitar, all you do is cut the entire Duncan wire bundle above the splices.
Remember, you ignore the Gibson colors! Don't get hung up on what the Gibson colors are. Regardless of what the Gibson colors are, each
position of the connector serves the same function. Just orient the bare wire of each Gibson connector to the left, and attach the Duncan wires left to right as noted above. (Alternately, you can orient the bare wires on the connectors to the
right, and attach the Duncan wires in the
reverse order that I listed.)
As for how I figured this out: I tracked down the fact that the NECK pickups on Gibson pickups are coded the same as they have been for years. I did the Gibson to Duncan conversion. Then I tracked down what the new BRIDGE color codes are for Gibson, and realized that
each terminal of the quick connectors did the same thing ("thing" meaning north start, south start, etc.) on the bridge pickup; the wire colors were just different. So for the bridge pickup, I just followed the same left-to-right sequence, ignoring any color conversion recipes.
If you MUST know the color conversion pattern for the bridge pickup, I can figure it out for you and post it. But really, you don't need to know it to get the job done. The only reason you really need to know it is to install a Gibson bridge pickup in another guitar.