You are using an out of date browser. It may not display this or other websites correctly.
You should upgrade or use an alternative browser.
You should upgrade or use an alternative browser.
Guitar Skins?
- Thread starter Masta' C
- Start date
Jack_TriPpEr
Well-known member
Thanks!
I am going with a quilt pattern. I am asking him to change the color to something similar to a santana yellow.
I am going with a quilt pattern. I am asking him to change the color to something similar to a santana yellow.
Last edited:
The Dali
MeltedClockologist
Hey - Dali - what do you make those out of???
I got an idea....
Ace, I use CD Labels (the booklets) or old calendars or posters... and then cut them up and apply with spray adhesive and then clear coat with 1 or 2 coats of epoxy. I used to do spray lacquer but it took FOREVER to get complete coverage. I went to brush on poly but the finish was never satisfactory. The epoxy usually cures like a near-factory-finish and it only takes a weekend.
Got you VM.
Jack_TriPpEr
Well-known member
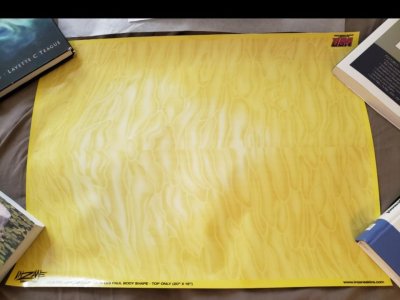
My skin arrived about a week ago. Here is a pic.
Early next week i have earmarked some time to try installing it. If I like how it looks and it seems like a quality product, I will then apply some clear coats to it before I reinstall hardware back onto my guitar. The company provides you with a free e-book that covers how to apply clear coats, how to tape, mask, and prep a body before painting.
EDIT: It comes shipped in rolled-up format. So that's why you see some books in the corners, flatting it out.
Attachments
Last edited:
My skin arrived about a week ago. Here is a pic.
Early next week i have earmarked some time to try installing it. If I like how it looks and it seems like a quality product, I will then apply some clear coats to it before I reinstall hardware back onto my guitar. The company provides you with a free e-book that covers how to apply clear coats, how to tape, mask, and prep a body before painting.
EDIT: It comes shipped in rolled-up format. So that's why you see some books in the corners, flatting it out.
I am curious to see how this pans out.
Jack_TriPpEr
Well-known member
I am curious to see how this pans out.
I will post back with pics of the results after I have done the deed.
I will post back with pics of the results after I have done the deed.
Cool. I have had students ask me about them, but I have no frame of reference.
Jack_TriPpEr
Well-known member
I think that if you take your time, it should turn out nice.
Thanks!
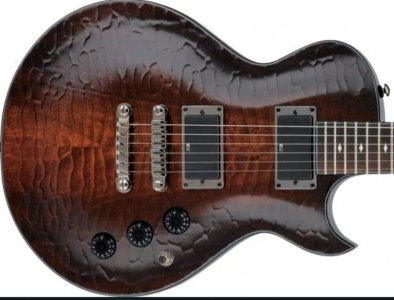
There is one characteristic about my guitar that does make the inatall a little more difficult. The guitar (an ibanez ART300) has a textured surface. In the Ibanez marketing literature, they referred to it as "supposed to resemble caiman skin". a.k.a. alligator hide.
So, I will definitely have to take my time as I slowly roll out and push flat, the skin onto the surface of the guitar, from back to front, checking for air bubbles and peeling back and reapplying as necessaey. Inzane recommended I have a hair dryer on-hand to apply some heat to skin because of this.
Attachments
Jack_TriPpEr
Well-known member
If I can get the skin to adhere well to the guitar top, I think that the textured surface popping through is going to add a bad-ass cool factor to the blond quilt look of the skin. Fingers crossed.
eclecticsynergy
Well-known member
Ace, I use CD Labels (the booklets) or old calendars or posters... and then cut them up and apply with spray adhesive and then clear coat with 1 or 2 coats of epoxy. I used to do spray lacquer but it took FOREVER to get complete coverage. I went to brush on poly but the finish was never satisfactory. The epoxy usually cures like a near-factory-finish and it only takes a weekend.
Got you VM.
Is it spay-can epoxy that's given you good results?
Jack_TriPpEr
Well-known member
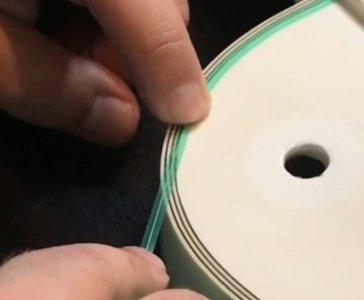
I got started on the skin installation tonight but had to stop at the optional step where you apply knifeless tape running around the top of the guitar along the binding - so you can surgically cut the skin later and leave the binding showing. It's optional but I wanted to try and do this because retaining that binding could make the final result look a lot sharper and natural. It turns out that the "WrapCut Pro" brand of knifeless tape that I purchased is underperforming compared to the 3M brand tape that John uses in the instructional video (see below). It won't lay flat when you begin bending your line to follow the curves of your guitar - so air bubbles remain that do show up later through the skin that sits on top. I did a test on a small section of the guitar top to confirm. This WrapCut Pro brand is also more difficult to work with because the tape coloring is opaque so it's diffulicult to see the string within it as you're applying it and trying to follow the binding. Whereas the 3M tape is translucent and so the tape wihin is clearly visible. Finally the 3M tape has an equal amount of tape on both sides of the string - so the string is centered - whereas the WrapPro design is narrower and the string is positioned along one edge of the tape. This also makes it difficult to place it as you're applying it.
So I will have to wait to resume until I have acquired some 3M brand knifeless tape.
The good news is that the skin seemed to adhere easily and smoothly to the guitar top in the small test section I tried.
https://youtu.be/LBSN6XPDuvA
So I will have to wait to resume until I have acquired some 3M brand knifeless tape.
The good news is that the skin seemed to adhere easily and smoothly to the guitar top in the small test section I tried.
https://youtu.be/LBSN6XPDuvA
Attachments
Masta' C
Well-known member
I think that pattern will look great over your textured top! A little heat and some rubbing should get it to conform to the uneven surface.
Love the color you went with also!
From the research I've done, it's worth the premium to spring for 3M knifeless tape when doing any vinyl work
Love the color you went with also!
From the research I've done, it's worth the premium to spring for 3M knifeless tape when doing any vinyl work
The Dali
MeltedClockologist
Is it spay-can epoxy that's given you good results?
No, two-part pour epoxy. I use Pro Marine epoxy and I've had great results. A little blow torch and it is 95%-99% bubble and dust free, Creates a factory finish in most cases. But, I've had to do over 35 guitars to get the experience needed to get it right. Plus another 25 pickguards... Definitely not a "plug and play" medium.
The Dali
MeltedClockologist
I got started on the skin installation tonight but had to stop at the optional step where you apply knifeless tape running around the top of the guitar along the binding - so you can surgically cut the skin later and leave the binding showing. It's optional but I wanted to try and do this because retaining that binding could make the final result look a lot sharper and natural. It turns out that the "WrapCut Pro" brand of knifeless tape that I purchased is underperforming compared to the 3M brand tape that John uses in the instructional video (see below). It won't lay flat when you begin bending your line to follow the curves of your guitar - so air bubbles remain that do show up later through the skin that sits on top. I did a test on a small section of the guitar top to confirm. This WrapCut Pro brand is also more difficult to work with because the tape coloring is opaque so it's diffulicult to see the string within it as you're applying it and trying to follow the binding. Whereas the 3M tape is translucent and so the tape wihin is clearly visible. Finally the 3M tape has an equal amount of tape on both sides of the string - so the string is centered - whereas the WrapPro design is narrower and the string is positioned along one edge of the tape. This also makes it difficult to place it as you're applying it.
So I will have to wait to resume until I have acquired some 3M brand knifeless tape.
The good news is that the skin seemed to adhere easily and smoothly to the guitar top in the small test section I tried.
https://youtu.be/LBSN6XPDuvA
Wow!! Very interesting! I hope it works out for you. I will say that I understand the desire for the top binding, but I think you will have trouble getting it to cut clean to your satisfaction. I would suggest taking the wrap to the complete edge of the guitar and trimming - you still have the side binding to create your effect. I know the cutting on top will always leave an area or two that won't be cut "clean" and you will always notice it.
Jack_TriPpEr
Well-known member
I think that pattern will look great over your textured top! A little heat and some rubbing should get it to conform to the uneven surface.
Love the color you went with also!
From the research I've done, it's worth the premium to spring for 3M knifeless tape when doing any vinyl work
Thanks!
The 3M tape arrived in the mail yesterday. This coming Monday I will have a chance to try it out.
Jack_TriPpEr
Well-known member
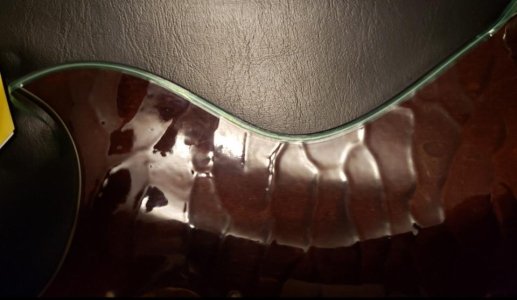
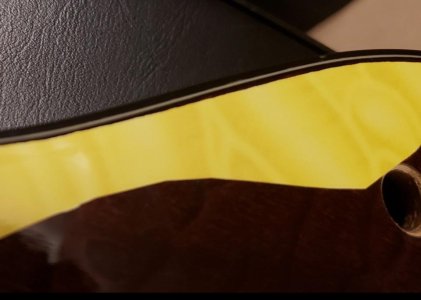
I returned to this project this evening.
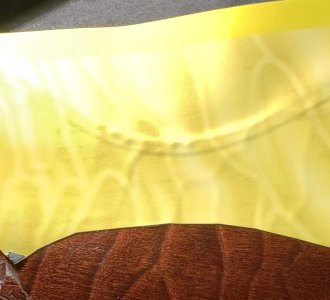
Wow, it's a night and day difference in how the 3M brand knifeless tape performs vs the WrapCut brand. No placement or bunching issues with the 3M brand.
Here's a couple pics of the small test section I tried this evening. The first one is the tape applied before the skin is applied over it. The 2nd pic is after the skin was applied and the knifeless tape peeled back to expose the binding.
Not sure if it looks better with binding still present or not. I did some online reseach of flame and quilt tops and it seems binding is actually not prevalent on these kinds of tops. If I did decide to keep the binding exposed, I would change my positioning of the knifeless tape so the band of black on the inner side would be narrower.
What's everyone think, keep the binding exposed or cover it up?
Attachments
Similar threads
- Replies
- 26
- Views
- 841