Problem with that is that it makes for a very thick final finish (after the metal flake is applied and allowed to cure, the finish is very rough-like 80 grit sandpaper) and you need to apply many coats of clear with sanding in between to end up with a smooth finish. If you've applied multiple coats of the metal flake before the clear coats you'll have a very, very thick finish which will take months to cure before you can final sand and polish.
You are using an out of date browser. It may not display this or other websites correctly.
You should upgrade or use an alternative browser.
You should upgrade or use an alternative browser.
Painting some bodies
- Thread starter blakejcan
- Start date
eclecticsynergy
Well-known member
I love big flake. That's beautiful.
blakejcan
Well-known member
here's a question for the flake people out there-----how do you know when you're all done with the clear and it's buried enough?
Is it when the entire surface is level with no flakes sticking up?
or are you simply making the tall flakes taller everytime you layer on more clear and at some point you just have to do a test wetsand?
Is it when the entire surface is level with no flakes sticking up?
or are you simply making the tall flakes taller everytime you layer on more clear and at some point you just have to do a test wetsand?
ICTGoober
Well-known member
Is it when the entire surface is level with no flakes sticking up?
^^^ This. ^^^
The bigger the flake, the deeper the clear. It's time intensive, and takes more material than other finishes.
ICTGoober
Well-known member
sounds like this will take about 3 years to cure ha
The idea is to let it dry awhile between a certain number of heavy coats. This is why finishing takes up the most time in building instruments - true from the one man shop all the way up to Gibson.
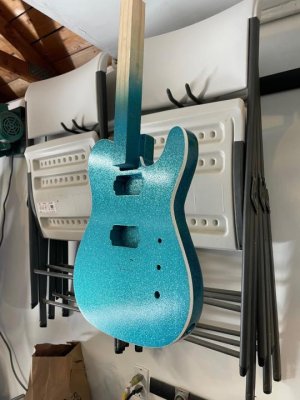
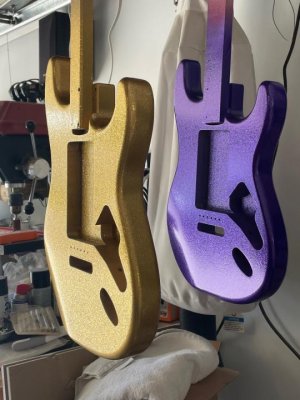
Let me start by saying those colors are beautiful, especially the blue and purple. That blue Tele is absolutely gorgeous...great color choice.
After 6-10 clear coats do a light wet sand (with 600-800 grit) to level the finish (get rid of "orange peel"). Yes, the finish will still be bumpy even after 10 coats of clear. You will never be able to put on enough clear to leave a smooth finish without sanding in-between coats. You have to be extremely careful and check often to make sure you aren't sanding into the metal flake. Obviously this process should start in a less conspicuous spot until you get the feel for it. If you are sanding too much, the metal flake will start to look silver before you actually get the finish flat. DO NOT sand any more! Do another 3-6 coats clear (no more than 3 coats per day an hour apart) and let it cure for 2-4 weeks then level sand wet. If you can get rid of all the orange peel and it's flat and smooth and no silver metal flake edges showing, then final sand up to 1500 grit and buff. If not, then repeat (apply a few more clear coats, let cure, sand, buff). If you don't have a buffing wheel dedicated to guitar finishing, sand to 5000 grit (800, 1000, 1200, 1500, 2000, 3000, 5000) then hand polish with medium then fine polish.
Yes, finishing any guitar is time extensive, but finishing metal flake is ridiculously extensive. Yes, you use a LOT of clear when doing metal flake. Yes, you spend a lot of time letting the finish cure. Yes, there is a lot of sanding. And yes, the finish will look gorgeous when done.
Note: this is for lacquer. If you're using poly the technique is WAY different. Apply 4-5 coats about an hour apart BEFORE any of the coats cures. Each successive coat will be applied when the previous coat is still sticky. Then let it cure a week or so before sanding and polishing.
blakejcan
Well-known member
Are you practicing for Mardi Gras or Fantasy Fest?
I laughed. Well said.
blakejcan
Well-known member
Let me start by saying those colors are beautiful, especially the blue and purple. That blue Tele is absolutely gorgeous...great color choice.
After 6-10 clear coats do a light wet sand (with 600-800 grit) to level the finish (get rid of "orange peel"). Yes, the finish will still be bumpy even after 10 coats of clear. You will never be able to put on enough clear to leave a smooth finish without sanding in-between coats. You have to be extremely careful and check often to make sure you aren't sanding into the metal flake. Obviously this process should start in a less conspicuous spot until you get the feel for it. If you are sanding too much, the metal flake will start to look silver before you actually get the finish flat. DO NOT sand any more! Do another 3-6 coats clear (no more than 3 coats per day an hour apart) and let it cure for 2-4 weeks then level sand wet. If you can get rid of all the orange peel and it's flat and smooth and no silver metal flake edges showing, then final sand up to 1500 grit and buff. If not, then repeat (apply a few more clear coats, let cure, sand, buff). If you don't have a buffing wheel dedicated to guitar finishing, sand to 5000 grit (800, 1000, 1200, 1500, 2000, 3000, 5000) then hand polish with medium then fine polish.
Yes, finishing any guitar is time extensive, but finishing metal flake is ridiculously extensive. Yes, you use a LOT of clear when doing metal flake. Yes, you spend a lot of time letting the finish cure. Yes, there is a lot of sanding. And yes, the finish will look gorgeous when done.
Note: this is for lacquer. If you're using poly the technique is WAY different. Apply 4-5 coats about an hour apart BEFORE any of the coats cures. Each successive coat will be applied when the previous coat is still sticky. Then let it cure a week or so before sanding and polishing.
Thanks! Helpful stuff here. I have finished about a dozen guitars now with either spraycans or my new HVLP (which is awesome) but I am always learning more. Metal flake is really stretching my patience and budget but I think it will be worth it.
That blue is going to have to be a bit of a light relic now cause my sprayer spit-up clear in blobs on it the other day and I tried to gently remove them and all the paint came off in tiny spots. Will still look great though. Been putting this Oxford vintage clear on it which with a couple rounds in the freezer does some amazing checking. It will only add to the sparkle factor.
solspirit
Ultimate Post Liker
I laughed. Well said.
Seriously, they look nice, keep learning and going.
Plus...every "failure" is not a loss, it is a positive learning experience that benefits the next attempt.
I've been making very expensive custom guitars for quite awhile now, and I still have those important "learning experiences". They can be very depressing at the time, but they make the next attempt so much the better.
I've been making very expensive custom guitars for quite awhile now, and I still have those important "learning experiences". They can be very depressing at the time, but they make the next attempt so much the better.
PFDarkside
of the Forum
Looking fantastic! Care to share details on the paint setup? And were these raw bodies you filled and primed? What paint?
It was a much smaller project, but when my son and I did the sparkle/flake pinewood derby car we did enough coats to make it look kind of wet and bumpy when it was fully cured. I thought we would burn into the flake, but doing that first level sanding was one of the most fun and coolest projects I’ve seen come together.
Best of luck!
blakejcan
Well-known member
thanks!
Been using these paints. Love the stuff. Lots of great color options and you can get it in a can or for a spray gun
https://oxfordguitarsupply.com/product-category/lacquer/
Using the Fuji Semi Pro 2 HVLP with the top feeder. Very easy to use and clean.
Been using these paints. Love the stuff. Lots of great color options and you can get it in a can or for a spray gun
https://oxfordguitarsupply.com/product-category/lacquer/
Using the Fuji Semi Pro 2 HVLP with the top feeder. Very easy to use and clean.
Similar threads
- Replies
- 11
- Views
- 302


